Every once in a while, I'll find out how badly I've been stuck under a rock. Case in point:
The Sharpie Magnum. I was at Home Depot picking up supplies for the next project, and while I was walking through the tool aisle looking for blue Sharpies, I laid eyes upon the biggest, baddest and most awesomest Sharpie I have ever seen! I just had to get one and see what it was like; if it could fulfill my every dream of marker perfection!
In that regard, it isn't and doesn't, but it is certainly super useful. The Chisel tip, as you can see below is really well designed allowing you to mark a HUGE swath, a BIG line or a PRECISE mark just depending on how you hold it.
If I find out that they make this thing in blue, I'll never buy another type of Sharpie again!
Now, here's a pic of what I was working on today:
I mostly used my camera, file, sharpie, machinist's rule, mini tape measure, a reciprocating saw (off camera at the time) and the PVC bits. The black bag is full of magic, though. It's one of my most useful sets of tools. LOL!
So, what is all the stuff for? Mocking up Pete's twin scroll turbo manifold! If you recall the picture I posted a while back of the really nice looking GT3076R? Well, this is the start of a manifold for that!
Pete and I decided that a Schedule 40 1.25" pipe would be the best bet for the manifold, but, I was doing some math and I found out that 2" schedule 40 pipe has nearly the same CSA (cross sectional area) as two of the 1.25" pipes. Since this is going to be a twin scroll manifold, why not keep the CSA constant after the primary merge? So, that is what I am going to attempt to mock up in PVC, since it is cheap and easy to work.
Lets get to work! First up, knocking down all the casting ridges on the PVC, as you can see here:
Now you might ask yourself, "Self, why the heck is he bothering doing something as anal retentive as that?" The answer is pretty simple! Taking care of those ridges will allow the fittings to fit flush, in necessary, which will make measuring and fitting more accurate and precise. Granted using PVC isn't exactly the most accurate way to build a template for this, but, I am mostly using it as a good visual aide an to figure out approximately how many bends and how much pipe I need to buy in order to finish a manifold of this sort. This will ultimately lead to a more succinct design process with less overall headaches, even if some of the dimensions change. This will also allow me to see a real, physical model in 3D, and hopefully will allow me to package the whole thing much tighter as a result, which is a huge concern given how tight the engine bay is of the car this whole mess is going to go in to.
After I filed down the casting flash, I started making some spacers to hold bits and pieces together:
This is the kind of fitup I am after:
Everything fitting together superbly:
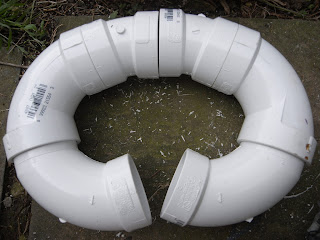
The main U is made from one 2" street elbow and one normal elbow.
The upper part is a 22 1/2"* elbow, which I like very much and may get some in the 1.25" size, also, to keep turns nice and easy for the trickier bits of running the inner (2nd and 3rd cylinder) primaries to their merge.
Here are the ready to experiment secondary pipes:
As always, more to come in the next few days! =)


No comments:
Post a Comment