Here's a newer Civic hatch that has some issues:
It originally had a Y7 engine in it, which was replaced with a Y8. The car was bought with the exhaust pulled off. Ron, the new owner wants to use the stock exhaust with a new muffler, so I got started figuring out what was needed to make that happen:
As you can see above, for some reason, the exhaust has been cut off before the socket flange, which was pretty awesome! I didn't have to weld anything together, just get the old part off:
Here's a closeup of the double-wall that Honda uses in many OEM headers:
That helps keep heat in to light off the cat sooner, but you can actually take out the inner layer to open the exhaust up enough to make a significant (but not huge) HP gain. If you want to learn more about how to do that to stock headers, do an interwebs search for "moose mod header."
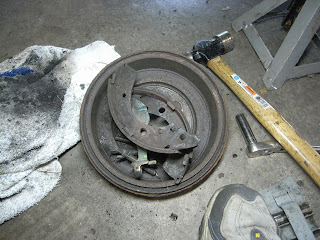
The next issue is that the passenger rear drum locks up and will not release when the hand-brake is applied and then released. Opening up the rear drums, I found pretty typical wear, but nothing terrible, and certainly nothing that would indicate an cause for the issue.
Here is the passenger side drum brake setup in all it's stock glory:
The only thing I saw was this:
The wheel cylinder boot had come off. Not a huge deal.
Some people freak out about this:
Everything taken off and sprayed down:
Cleaner is better!
So, time to start cleaning:
In all honesty, I prefer the rear drums on Civics and Integras over the crappy integrated-parking-brake rear discs that everyone is so crazy about. Why? I like functional parking brakes. I can adjust the drums to lock hard and fast much more easily than with the rear discs. Also, they last a heck of a lot longer! It is NOT uncommon for bone stock rear drums to last over 100k miles. So, better functionality and last longer? Yes please. I'll keep mine.
I'll share some tips now on how I keep rear drums working as best as possible. One of the things that make most disc brake setups "better" than drums is friction in the actuating mechanisms. There are a lot more moving parts that rub on each other and that can lead to bad pedal feel and the bad rap that most people give drums.
The biggest source friction in the drum system, IMO, is the shoe pads. No, that isn't being stupid, the pads are where the shoes ride against the back plate of the drum as the brakes are actuated.
This is how they look after getting sprayed off:
Now it's time for cleaning!
I applied a simple wire brush treatment to everything to get off all the brake dust residue that was still stock on everything:
More dirty stuff:
After wire bushing everything, I sanded down the pads. You should be able to see the difference here:
I also sand down the pads on the back plate to minimize the friction between the two.
Now that you have a slicker surface for the shoes to ride, it's time to apply some proper lube. For this job, there is only one kind you should use: Silicon based caliper grease. This stuff is capable of withstanding very high temperatures and pressures that are associated with brake actuation
Here is a bottle I bought years ago:
I've done dozens of brake jobs and this thing is still half full. It is absolutely worth it to get the thing for under $10.
I apply this stuff on all sliding surfaces, and also on the wheel cylinder boots, as it protects them from drying out and from the abrasive brake dust. Here is what it looks like:
You don't need whole heaps of the stuff. A thin layer between things is all that is needed. I also lube up the e-brake lever pin and the e-brake lever and shoe "spine" since they rub on each other. (You will see the wear marks, and usually some rust where the two meet.)
Carefully put everything back together (yes . . . drums are a pain and take longer, but you have to do it way, way less often!) and then test out the e-brakes to make sure that they work correctly. You'll also need to adjust the fitment. A proper fit is two clicks off of slight drag when spinning the rotor by hand. The tighter you can make it without drag, the better the response will be.
The last step is to apply some anti-seize to the threads on the wheel studs:
I hate not seeing a dab of anti-seize on studs, since it will help you get more consistent torque and also make taking the lug nuts off in the future.
After putting everything back together, the e-brake still locked up the passenger rear, so I investigated further. I pulled out the center console cover and watched the e-brake mechanism as I pulled the handle. The cable for the passenger side barely moved, while the driver's side moved a normal amount. I climbed under the car and didn't see anything terribly amiss, but can only conclude that there is something wrong with the cable itself, which is very rare to have an issue with, at least in my experience. I'll be replacing that cable soon.


Dude, my 92 sedan has the same issue. I don't think it's uncommon. I'll let you know what I find when I eventually get to looking at it.
ReplyDelete