Tag Line

"Built Dam Strong!"
Showing posts with label exhaust manifold flange. Show all posts

22 May 2012

DOHC ZC flanges, tri-y headers and some good tips for V-band flanges

I thought I would grab some detail pics of the DOHC ZC flanges I got in!

Here is one on top of the C-channel piece I got to do header fab from:


Laser precision!


Once the header gets made, I will flap wheel those marks out and smooth it up, and given how nice they are, it shouldn't take long at all!

Today I got a lot done, though I had to take a huge step back because of a glaring mistake I made, but I definitely made the best out of the situation and am really stoked about the next few days!

Here's the tubes for the smaller of the two 4-2-1 headers you may have seen in the background of some of my pics:

I had just finished sanding them. I wanted to attempt to get into the "crotch" of the first 2-1 merges, but, as you can see . . . that wasn't gonna happen:


Welp, it's only metal. Time to cut and paste!


I then took the time to wire wheel the whole setup. The pieces came out really good looking!


This is a weld from when I welded the merges into the whole collector:


I love the way brushed steel looks!

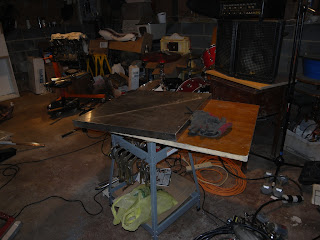
This is an process photo of setting up my ghetto rigged welding "table:"


Yes, that is a half a door with a stainless shelf I liberated from a recycle pile. I clamp my ground lead to the shelf and it provides a really decent ground for anything placed on top. I use a wire wheel to break up the oxides on the surface a bit each time I use it, and that really does help make better electrical contact. 

Enough talking, more welding!

Here is the start of welding up the v-band onto the tail of the collector:

You'll want to note that I actually extend the pipe through the collector a bit:


(More on why in a few more pics.)

Best part of the weld on the v-band:

Inside the pipe, yes, that was cleaned up afterward:


Now here's the flange without the other half on.


Welding the v-band flange like that does a few things for you:
1. Self-indexing connections are easier to put together by yourself.
2. The connection will seal better, as there is no split at the joint of the flanges.
3. Welding with the whole v-band assembly together helps prevent warpage. 

Overall, this is a much better way to do things as long as you have the extra space to do so. Just make sure you leave enough of the other side's flange to get a good weld onto the exhaust tube. 

Next, I welded up the "crotches" of the primary merges:


Then, to correct for lack of proper equipment, I welded on slip-fit rings onto the primary merge legs

Mockup:


(Note, the sanded portions of the slip fit rings! ALWAYS clean your metal. ALWAYS)

Getting things started off RIGHT!


Still have a lot to learn about welding this stuff, but I am definitely getting better. 


After the slip fit rings were welded on, it was time to re-weld the primary merges to the rest of the collector. I chose to gap these welds, and used my handy-dandy body panel clams to space everything correctly:


DONE! 


I love the way that thing looks. 
Here's a closeup of the welds in the middle:

A friend of mine who is a very excellent welder told me to try using thinner filler. I will certainly do that. I'll also try a few other techniques for joining this thin tube that he mentioned. (Thanks, Remo!)

Now that the collector is 99% done (there is actually some porosity in one of the welds that I am going to cut out and weld over. I have no idea WTF caused it, but it might just be an odd spot in the metal which happens on occasion), It's mockup time!


The collector is easy to hang by itself, but when you add this stuff:


It gets a lot harder to manage by one's self. 

Another view on the ground:


In place, sort of:


This being my first completely from scratch header build, I have run into some issues. LOL! Since I cut the collector apart, my primary tubes are a bit off, as you can see in the next two pics:


The simple solution for that is to cut and past, again. heh The problem is that I need to get the collector in place first and it needs to be on something solid. I will have to build a fixture for it in order to keep everything where it needs to be. My primary concerns are getting as close to the oil pan as practical to maximize ground clearance, and to make sure that the header ends in a spot that will actually fit in a car.
I oopsed that with Justin's headers, because he wanted it tucked TIGHT to the pan, and I ran it straight back from the corner of the pan instead of the middle of the pan, which lines up better with the center tunnel of the car.

Whew . . . what a long post. It was totally worth it. I really enjoyed cleaning up after today. The next header I build in the coming days and the battery tray and seat pan I am going to fabricate are going to push me to new levels of pickiness. I just want to make sure the people I am doing work for are satisfied with it! I always want to do the best job possible.

18 May 2012

DOHC ZC flanges, chaos and some maintenance.

There were several packages waiting for me at my "shop." I love opening packages, especially when they contain really awesome things!

First up: 1/2" laser cut mild steel exhaust manifold flanges!


These things are AWESOME! The fit is very excellent. The ports match up nearly perfectly, better than other flanges I have used before. I am always amazed at how technology progresses. I highly recommend the dude I dealt with. If you want his contact info, please leave a comment or email me. 

I was accused of going overkill in specifying 1/2" thick flanges, BUT . . . I have seen 3/8" flanges warp while everything was being welded (even though I am going to take steps to prevent that) together and also, I prefer that the flange be as dimensionally as stable as possible to prevent shift or adding further stress to the rest of the manifold. Since these flanges are heavier than necessary, they will be perfect for either NA or turbo applications, and the flanges are going to see use for both of those differing purposes very shortly!

Ugh . . . Chaos. 


This is not how I prefer to operate, but sometimes a bit of craziness is necessary in order to get things done. I need to start getting the other half of the Garage organized so we (the owner and myself) can get everything situated so I can leave my stuff in place and actually get settled in, which really helps get the ball rolling on projects.

Some other quick things:


I now have a ground cable that isn't shorter than I am tall. That was a serious pain when working on that hopper a few weeks ago! LOL! That is a 25' line now. I also took the liberty of crimping it correctly this time. heh

Below is my next addition to my tool collection:


Not the torch, it is the same CK setup as before, but I now have leather line protector installed! This will help keep everything lasting longer, though it is much less compact now. There are always tradeoffs for these kinds of things, but for me, protecting a not cheap line is much more important than being able to roll it up into a smaller box at the end of the day.

I happen to like this next picture as I think the light was captured really well. (I've been playing with bounce flash a bit.) 


I got a bottle T so I can use two regulators. I as simply using the valved Y you see on the left, and it worked very well, indeed, however . . . using two regulators is going to allow me better control and reduce my gas usage and therefor costs. I won't be doing much back-purging on the rest of this bottle, but I can get heaps of stuff welded up before the bottle runs out. I am seeing if I can exchange the bottle at a more local LWS (Local Welding Supply) that is owned by the same parent company, that way exchanging the bottle won't be a half a day affair. I WILL say that getting the 330CFH bottle was the best thing I've done. I've done nearly all my welding you see here and a bunch more on just two fills. That is phenomenal! 

Other things I did:
-Tested a cheap footswitch from HF. It works great for the bandsaw when it is in the stand, and will be useful when I get a new motor for my (cheesy cheap) drill press soon. Two hands on your work is important to staying safe.
-Cut up some 1.5" diameter stainless rod that is going to be sent to a friend of mine who has a lathe . . . muahahahhahah
-Installed a new collet body and gas lens screen on my torch.
-Organized various nuts and bolts into a divided compartment plastic container
-Broke down a bunch of unneeded boxes for the recycle pile.
-Tapped the two un-tapped holes on my HF workbench (the one that the bandsaw stand is clamped too above) and finished putting it together. I am surprised, but it is really sturdy, definitely worth the $27 or so! The top is going to have to get replaced and the really crap fiberboard shelves are not even worth installing, but the frame is really not bad at all, surprisingly!
-Unpacked a set of mandrel bent tubes, cones and other oddities . . . *winks*
-Planned out my day for tomorrow. 

And there we go! A fairly productive few hours. Tomorrow is going to be focused on cleaning up a bit, setting up an uncluttered work space, and then knocking things off the list. By taking the time I did today, I will ensure that other things tomorrow and in the near future will go more smoothly or at least with less incidence than would otherwise happen. Tomorrow will involve a lot of prep work and some templating, but you'll see that as it gets done. =)