Tag Line

"Built Dam Strong!"
Showing posts with label DOHC ZC. Show all posts

01 December 2013

Project Lazarus: Front Suspension Rebuild, Part 2

So I left off having done the hard part yesterday, taking off the hubs. Today started off with a bang. Literally. Smacking the rest of the bearing out with a hammer:

For the record, I hate pine needles and working around, or specifically under, pine trees. Geez. 

Don't forget to pop the dust shield off the back of the knuckle when removing the lower ball joint (again using a hammer since I was there and it was easy):

I managed to strip a few of the screws that hold the dust shield in place: 

They will get drilled out and replaced. I want to pull EVERYTHING apart and clean it all off so I can paint the whole knuckle. I want to do this once and do it right.

Speaking of cleaning, I busted out the WD40 and a green Scotchbrite pad and went to town on the bearing race of the knuckle: 

This is what the other one looked like before I started: 

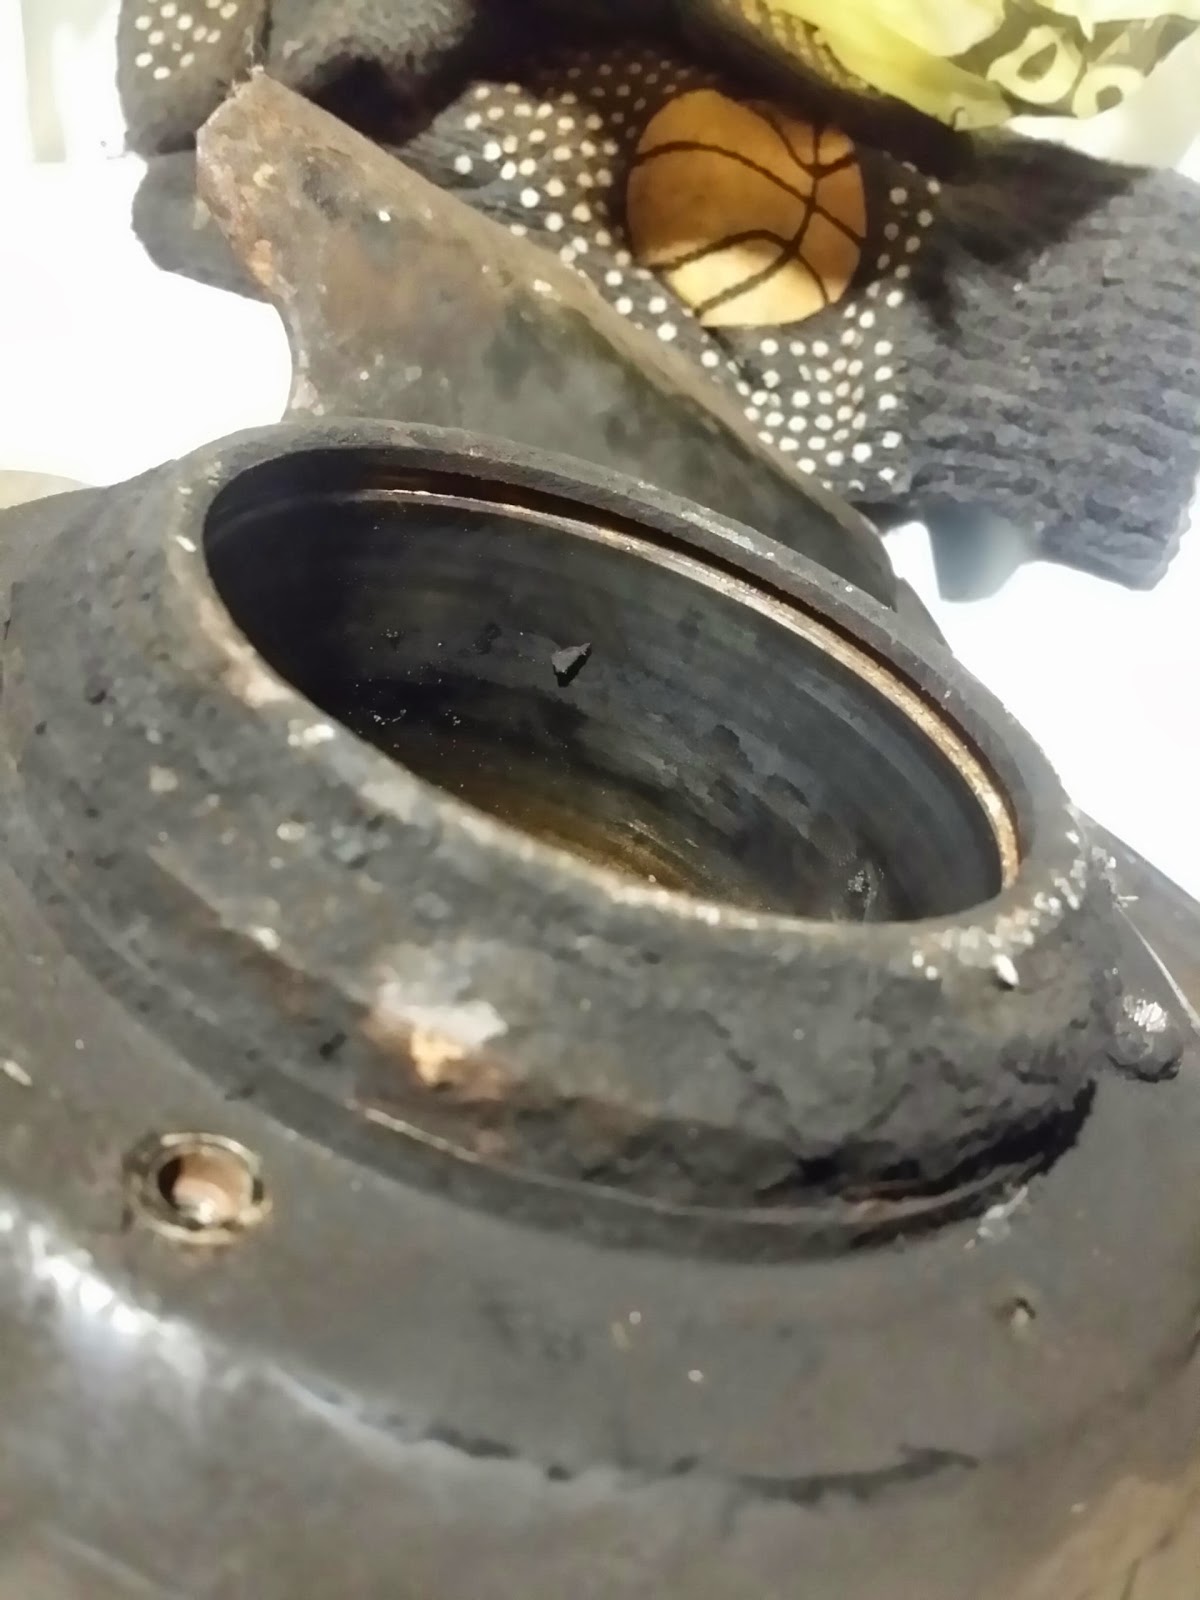
The second one after the treatment: 

It makes a good bit of difference! But, notice all the exterior gook that is going to have to come off. Not too tasty. Someone had lost an axle boot sometime previously. 

I also cleaned up the bearing retaining rings: 

So, I have two brand new bearing:
What's a guy to do? Take them apart! Wait . . . what? WHY? Because racecar. I had found a very interesting post on a forum detailing how to repack bearings with superior grease. I did some research on this and talked to a few people who race Honders and found that the smaller civic bearing hubs have issues when racing (with big, sticky tires, bigger brakes, blah blah blah) unless the grease is replaced with something designed to handle the higher heat input to the bearings. I was convinced enough to go through the trouble and the risk of breaking something I've never tried before. On with the pics!

The Timken bearing is actually a reboxed Nachi. I thought this was a good thing since Nachi seems to be a good name in bearings and it is made in Japan.  

I decided to take apart the Koyo bearing first, so these next few pics of of the Koyo. I popped the inner races out: 

Pried out the balls and kept them together in the Nachi/Timken bearing for safe keeping: 

Then my fingers got really greasy so I didn't take a lot of pics, but I cleaned out the original grease as much as possible and got ready to repack the bearing with this: 

Looking at the test reports for this grease, it is very evident that it is REALLY good without being ridiculously expensive or hard to come by. It was recommended highly by many several racers and I think it will serve me well. It has a very interesting texture. It isn't as waxy as the original grease and when you pull a glob out of the container, it leaves very, very long stringers almost like taffy, but much thinner. 

I don't have ay pictures of the bearing after it was repacked, but, basically the grease is red instead of white. I didn't have any issues with it at all! Yay!

I was feeling pretty good and moved on to the Nachi: 

Woah! I know it might not be easy to tell, but this bearing had VERY LITTLE GREASE IN IT compared to the Koyo. So little I was kind of concerned. I didn't really need to wait very long to have my concerns made moot by the fact that the first ball I popped loose also took part of the plastic cage with it: 

Cue trombone: Wah wah waaaaaaah!

So, I won't be using THAT bearing. I've already ordered another Koyo. Live and learn. But, based on this, I will NOT be recommending Nachi bearings. The low amount of grease in the bearing from the factory is a huge concern to me, anyway. 

Another view of the broken cage and also showing how little grease is packed in with the balls: 

Since I didn't have any more bearings to bother with packing, I busted out the cheap wire brushes and set about cleaning up the hubs. Autozone wire brushes: 

Clean and shiny hub, and also showing a bit too much aggression with the bearing seperator:

It's mostly just a surface blemish, it isn't a deep scratch. I'm not really worried about it at all. 

I am going to take a powered wire brush to the hubs to really get all the rusty crud off before painting. Since I have to wait for the new bearing, I might as well clean and paint everything as best I can. 

That leads to the next question: are these upper control arms for a CRX? I am terrible at playing this game. I can't easily compare them to the ones on my car, and they might just be from an Accord. Does anyone happen to know?

The last thing I did before I called it a night was to test fit my lug nuts on the new wheel studs. I figured it would be better to check BEFORE they get pressed in. Sure enough, one of the studs has an odd spot on it that really binds the lug nuts. I don't know if you can really see it in the next two pics, but it is a very slightly darker colored spot: 

These don't break the bank. I will buy another one soon. I don't need it until I do the rears, which is likely a few months away yet. 

That's about it for now!  

Project Lazarus: Rebuilding the front suspension, Part 1

This past weekend, being Thanksgiving weekend here in the US, didn't turn out anything like I had planned. It was quiet and restful, for sure, and that was a very good thing, but it wasn't as productive as I thought it would be. That's mostly OK, though. I needed the break. I won't get another break like this any time in the foreseeable future, so, I took advantage of it. =) 

My CRX is rocking stock suspension, aside from new shocks and springs, from 1988. (89 model year, sold in 88.) Yeah, I think it is time to do something about that. The biggest issue right now is the bushings. The car tends to wander a bit under power. Cruising, it holds fairly straight, but get on the gas and you better be paying attention. Most of the ball joint boots are on the verge of falling to pieces, too, so, pretty much everything needs to be replaced: bushings ball joints and eventually steering bits, too. 

The first things lined up to do are new wheel bearings. I had purchased a set of EX knuckles and brakes a while back, as they are a direct bolt on swap that allows for proper suspension geometry and also going from 240mm (9.5") discs to 262mm (10.3") discs on a completely OEM package. On a light car, I think that the typical 11" brake packages are overkill, and my CRX is certainly light. I do, however, want a bit more thermal mass in the brakes, so the 262mm rotors are the perfect compromise. The larger rotors increase the braking torque applied (as the moment arm is longer) with less pedal effort, which is a good thing since I greatly downsized the brake booster to fit a future intake manifold. (Not that the brakes are terrible right now. They work.) Overall, I am expecting the brake part of this to work fantastically.

Anyway, enough rambling, on to pics of work!

This is the "Heavy duty slide hammer" package from Harbor Freight:

I'll probably write up a separate review of the thing. It works, but man, parts of it are terrible. It worked to pull one hub out of the bearing, but not the other. I don't have pics of it in use as I needed both hands and feet to work the slide hammer since the knuckles I am working on are off the car. If they were on the car, I honestly would have had much less of a difficult time getting the hubs out.

The stubborn hub required flipping the knuckle over onto some 2x4s, finding a socket (in my case a 28mm SnapOn 1/2" drive socket fit perfectly) and bashing the hub out with a minisledge. Not something that is good for the bearings, but since I'm replacing them . . . Yeah. heh I finally managed to get the hubs out, and then popped the wheel studs out in my HF 20T press, ending up with this:


The shiny rings on the stem/stub of the hubs are one of the inner bearing races (races are where the balls of the ball bearings roll, kinda like the track at a race track, but with much less crashing, hopefully) and those need to get removed as well. If you plan on doing this job yourself, you will nearly always have this issue, so it is better to be prepared to deal with it right away. 

Before I get to taking the race off the hub, here's a look at what I am doing with the studs:
In order to be track/strip complaint, you are supposed to have extended wheel studs and open ended lug nuts to allow track officials to see that you actually have your wheels fastened on correctly so you don't kill yourself or other people when racing. I REALLY didn't want to have to deal with the Roman War Chariot look that you get when using the ARP wheel studs, but I did need something longer, so with some help from my parts store pimp, Mike, I purchased enough of the longer wheel studs you see above for the whole car. 

Wheel stud part number:


The knurling isn't exactly the same, but it will fit in correctly and securely and I won't have to worry about anything at the track. YAY! (I also bought some Gorilla brand open ended lug nuts, too, so I am ready!) 

The studs are very good quality, and on the base of the stud, you can see that they are very strong, being "10.9" standard hardware:


Way better than those cheap, crappy "tuner" studs that people buy with the scary aluminum lug nuts made in who knows where out of stuff that really isn't quite metal. heh
So, back to getting the race off the hubs! My dad was a big help as while I was taking all this crap apart, he volunteered to stop by Harbor Freight on the way back from food shopping and pick this up for me:


This package definitely deserves a (mostly positive!) review. I was very surprised to see an ACME thread on the "pressure shaft" (I forget what it is supposed to be called). Acme threads are square shouldered instead of angled.  This lets the threads take a LOT more force without galling. In this kind of tool, where a heck of a lot of pressure is built up, you need that. YAY!

The first race took a bit to get off as I was still getting familiar with setting up the tool, and I had to change configurations a few times until I figure out exactly what worked, but work it did!

I first tried the smaller seperator, but the radius of the inner part really didn't match well to the radius of the outside of the race:
Closeup:
  

That wasn't going to work well at all. I swapped over to the larger seperator and was a bit annoyed at the studs, as they were barely long enough to fit. I managed to get the nuts threaded on securely enough, though:
 

 The next step was to set up the puller bits. 


At first I used the thick piece of steel across the top, thinking the race would pop loose after it started moving, but I was mistaken. You can also see the ACME threads in the above picture, too. 

I managed to get the race pulled up as far as the bar would allow:

But I had to come up with a different plan. I had the socket that I used to pound the second hub out, but sockets have holes in the back for the drive of the ratchet, so I needed something to cover the holes enough to prevent the shaft from going through, but still fit through the race when it pulled free. I managed to find some washers, though they were really thin. I tripled them up and hoped for the best:
It worked!


The first race pulled off really easily since I had already started it moving with the bar across the top, so the washers didn't bent very much:


Pulling the second one off with just the washers on the socket bent them a good bit, but it really wasn't as bad as I thought and it worked well enough so that I got the second one off in less than 10 minutes. Cool!

Too be continued . . . 

17 November 2013

Omnibus Project Lazarus Update

 First up: Rear drums!

I started getting a crappy pedal and some brake fluid on the rear passenger rim. I opened up the drum and this is what I found:
 Yeah . . . Not so good.

Even worse, the hardline was frozen to the wheel cylinder. So, what's a guy to do? Bend up some new lines. Brilliant. =(

I really don't like bending brake lines. It's always a pain and mine never come out as nicely as I think they should. Oh well. As long as it works, right? I was also fortunate that a neighbor of mine had some spare line and a double flare kit. You do double flare your brake lines, don't you? (Shame on you if you don't.)

I was having issues not being able to form the flare correctly with the hand kit:

So, I figured I could employ my then newly acquired 20T HF press. I used the clamp and the anvil that normally gets screwed onto the yoke to complete the flare:

The CRX rear lines are 4.75mm, just in case you were wondering:

Completed double flare and one of the salvaged old fittings:

 Pic of the massive arbor plates I still haven't cleaned up but are still perfectly useful:


Necessary tools:

 Crappy pic, but, you can see that the flare is much more centered:


Came out a bit crooked:


But after some tweaking, it fit really well with the new fitting:
 Random cat pic!

I added a rubber grommet to keep the radiator from flopping about and also wearing the tab off:

The alternator bearings decided to get really bad, so I replaced it:

Then the dizzy took a dump that lead to a whole bunch of issues with ignition timing. I thought I had gotten the cam timing incorrect, and had to get clever with holding cams in place. This worked surprisingly well:


I checked out an engine for a guy I know and when we pulled the head off, something was "slightly" off: 

I also need a new gas cap:

The ignition timing is still off, but it is at least drivable. I'll deal with it for now.