Tag Line

"Built Dam Strong!"

05 June 2012

Another busy day

I grabbed some pics from Dave showing how much bigger the new motor is and just a much nicer pic of the drill press as it currently sits:


Today started out with a journey all over New Jersey. That is not usually my favorite thing to do, especially since I ended up in Trenton, but, all in all, things went well. I first drove down to the McMaster-Carr warehouse in Robinsville. I love that place. I picked up a few things:

3/4" aluminum rod to repair Mike's brake drum, SS springs for header retaining and much better sized SS washers for Dave's bike. I forgot the other washers, so I didn't get to return them. After I stopped in to check on the status of the above stuff, I was told that since the orders were placed late at night it would be a while before the orders came up to to the pickup area. That was fine with me since I needed to exchange my argon bottle (FINALLY!). The nearest place I could exchange it was about half an hour away in Trenton, so, I went there and found a really pleasant manager of the store who was very helpful. We discussed the possibility of purchasing a small acetylene bottle and whether or not I could exchange the old oxygen cylinder I was given a while back. Overall a very pleasant experience, and if I can time my pickups correctly, I will be going back there. 


Once I got back to my "shop" I set about prepping the mandrel bends for welding. This mostly involved lots of wire brushing. So much so that I got tired of holding the drill and having the tubes slip around so . . . I got creative:


That saved a heck of a lot of time and was way safer than holding the pieces in one hand and the drill in the other. Two hands controlling a piece you are working on is nearly always safer! Safety doesn't always have to mean slow. I saved at least 45 minutes putting together that quick setup! 

That took care of the outside of the tubing, but you can't forget the inside! Here is the tubing ready for some flap wheeling with the hanging moto-tool equipped with a mini-flap wheel:


That thing is awesome! A dremel ain't got nothin' on that! It made quick work of cleaning up the insides of the tubing. Since pretty much everything was prepped, it was time to start welding stuff together!

Here is the jig I used to attempt to keep things more consistent:
Darnit. I forgot to rotate a few pictures before exporting them. Oh well. I'll apologize for the taco neck, but, that's about it. 

Top view:

Close up:

The angle kept the legs on the same plane, or at least the same length. The block in the middle of the legs clamped to the angle is a 1/2" spacer to keep the Legs from pulling in too far (something that happened on a previous collector that makes things annoying off from square) and the clamped angle on top keeps the pieces flat and pretty well locked together. I like this jig, for now, but am going to make something more permanent in the future. 

My welds are finally starting to show tendencies of what I like to see. In this series of photos, you can see a progressively nicer bead developing, and I hope this trend continues!


What one must NOT forget is no matter how nice the weld is on the outside, the inside is what counts for exhaust flow! Here is the inside of one of my merges just after welding:

Typical stuff for welding mild steel. Note how well the "crotch" of the joint matches up and how smooth the flow path is. 
Same merge, just cleaned up a bit:

Much better! It only took a few minutes to do the work with this:

You can see how much use I have gotten out of that stone by comparing it to a new one: 


I got the megaphone and exhaust extension all welded together and was working on matching the collector outlet to the megaphone in this pic: 

While things were cooling off, I took the flange I am using and slapped it on the belt sander. Sanded on the left, as delivered on the right:


Since I will be indexing the rest of the header of cylinder number 4, I got that runner prepped and tacked in place:


I didn't get pics of all the welds I did on the collector because I was too busy getting work done! I have pics of the previous ones I've done that you can look for. It is mostly the same process, which is slightly boring. You weld a bit, then wait for things to cool down. Weld some more then wait . . . I did try to get as much done as possible instead of just sitting around and waiting.

Here's a good example of what I did while waiting for things to cool down:
That is Mike's drum. Here is a closeup of the damage I am going to repair:

A brake cable housing is supposed to slip into that broken hole. I am going to cut and grind the old material down and and replace it with this:

After I weld that piece in it's place, I'll finish it up nicely and ensure that it fits the brake cable.

Overall, I traveled a LOT and did a crapton of work. Towards the end of the evening, I started to get tired and made a few annoying errors like getting the tungsten completely stock in the weld: 


 I am going to grind that out and finish the collector tomorrow morning. I'll get the primaries mocked up by the early afternoon, and hopefully get to welding most of them up. I have to go home for my sister's birthday dinner in the evening, which puts a huge cramp on my working time tomorrow, but I will keep pushing forward to get this and the rest of the projects on my plate done.

 Tomorrow, most of my Amazon order should arrive, too, including the router speed control and new belts and discs. I have to say that the belt and disc that came with the sander actually are decent, but I am wearing them out through shear usage! I hope to have much more to report tomorrow! =)


03 June 2012

Gifts and gaffs; crazy day all around.

Yesterday was terribly frustrating at the start. NONE of the LWSs (Local Welding Supply) locales were open. WTF? How the heck is anyone supposed to get stuff to work on a weekend? Blech. I have to go tomorrow to exchange my welding gas bottle, which is going to take up a good bit of time that I really don't have. 

Enough complaining about things I can't change and just have to deal with. Dave and I made a heck of a lot of progress despite lack of welding ability. 

Dave came out and brought something really awesome. As noted in my previous blog post, the motor on my Che-ese (cheap Chinese) drill press really was sucking. Dave poked around his place and found a new motor, and what a motor it is! The old motor was roughly 4.5" in diameter and supposedly 1/2 horsepower. The new motor is 6" in diameter and rated at 3/4hp! 

It took some cobbling together, but, the new motor got hung off the press with a bracket I salvaged from an old bed frame that fit almost too perfectly with some quick trimming on the bandsaw. Everything went together so well it was nearly scary. Check it out:


Dave got some pics of both motors next to each other. I didn't get a whole lot of pics yesterday because I was actually working. heh Still, that motor is just HUGE!


The only complication was that I needed to get a new belt. I took some string and got a measurement on the pulleys, took it to a really awesome local auto parts place that was something the likes of which I haven't seen in years (in a good way). We checked out a few belts, and ended up with that green Gates belt you see. I love being able to just talk to an intelligent person behind the counter. When I answered the question "What is it going on?" with "A drill press," the guy didn't bat an eye, asking a couple good questions to figure out what kind of press it was and what I needed in the belt. It was such a change from the blank stare you normally get from the salesmonkies behind a chain parts store counter since all they know how to do is look stuff up by vehicle (and barely even that at times). 

The last two issues with the motor are that the motor, while being insanely smooth and VERY powerful spins too fast, even with the slowest combo of pulleys. I am actually looking at getting a "router speed control" off of Amazon and actually a non-contact digital optical tachometer (super cheap actually) to see if I can tone the speed down to run bits over 1/4" (which was determined experimentally with some scrap to see what the limits were on mild steel). The other issue is the ghetto-rigged wiring. I'm not proud of it, but for now, it works. It will be rectified as soon as is practically possible. I am aware that it is not "safe" but I have done a lot worse and survived. heh

Being excited about a working drill press is great and all, but it's not magically going to make all my projects get finished up on their own! Time to get work done! 

Box of bits to make a header from:

That is going to be put together ASAP since the team that needs the header needs it this coming weekend! They have a race and are going to be breaking in a newly built engine that is going to be wearing the header I build. I AM going to make that happen, no matter what!

I spent a while getting the final merged pieces matched up:

And also matched up the small end of the megaphone to the secondary diameter (1.75" since this engine will leave above peak torque):

I'm actually really frustrated with all the exhaust expanders I've tried. The one you see in the pic above is super beefy, but . . . I have to figure out how to get enough torque on it to actually expand 16 and 18g mild steel. That particular model is rated for use with an impact gun, but I didn't have one on hand and I don't like to make that much noise if I can avoid it. Anyway, I managed to match up the ID of the megaphone with the ID of the secondary merge tubes. 

As always, the bends are excellent mandrel pieces from Columbia River Mandrel Bends. The cones for the magaphone are actually Cone Engineering pieces that they stock. If you ever need a cone that CRMB doesn't carry, you can order direct from them. 

Dave was busy while I was working! Here is the start of the captive flanges for his header:

That is stainless 1/4" thick by 2" wide flat stock. Once we get the speed on the drill press under control, we'll drill out the center hole (likely 1 3/8") and the mounting holes (about 1/4"). 

Dave also got busy working on a mockup for his gas tanks (that will be hidden by the bodywork) using CAD:


He also brought a spare head that he doesn't care quite so much about for obvious reasons: 


I think that one chamber needs a few more red Xs, though! 

The head is going to get used to shape the flanges that are going to crush the sealing copper gasket. 

He was working on another makeshift "table" that we set up so he could have a nice workspace:


 He even managed to get in some time with a grinder smoothing out his swingarm. Proof of him working:

And of him being a complete goofball:


 Tomorrow is going to start off with exchanging my bottle at the LWS and heading to McMaster-Carr to pick up retaining springs for the headers I am building and some aluminum rod to repair a brake drum for Mike's CB750, which I'll get some pics of soon enough. Welding on cast aluminum deserves it's own blog post. I got really good at it due to having to fix all sorts of nasty stuff in the Army. It should make for an interesting write up. =)

02 June 2012

New tools in use and mounting an engine!

The past few days have been frustrating. First, the power dies at home so I couldn't mow the lawn (yes, I still mow the lawn) because "we" have an awful electric lawn mower. The next day (Thursday) I replaced the upper control arms on my Sister's Accord. That went surprisingly well. After that, I loaded up my car and went to drive off into the sunset, or, to my "shop" and get some work done. Then my Legend decides to nearly die on the way there. I decided to fill up while I tried to figure out WTF was going on. The engine would start up fine but had little to no power, reminiscent of my earlier troubles. I decided to be stupid and I drove to my "shop" and I made it there, through terrible traffic and slow going outside of traffic. I spent the evening checking things under the hood after pulling an "Ignition signal" code off the ECU. I went through the troubleshooting procedures, but didn't find anything terribly conclusive. I crashed at my friend's place, as I happened to have a sleeping bag and there is plenty of floor space for the grabbing. LOL! I spent a few hours moving stuff around in the "shop" consolidating a large volume into a more compact space in anticipation of lots of work of the next week.

I woke up this morning and got to work! I took the old SOHC engine off the stand:


I've had this cheap engine stand for over a decade:


 It was given to me for helping swap an engine ages ago.  It certainly has seen quite a lot of use and abuse and travel. 

I put together my new grinder stand:


This thing actually surprised me. It is well cast, the hardware is decent and it fits together perfectly. I have yet to bolt down the grinder, but that will happen shortly. The only complaint I have is that the tube supplied is a bit thin so it bends if you crank down too hard on the lock bolts. But, it is really sturdy and totally useable! 

The next thing I set up is this:


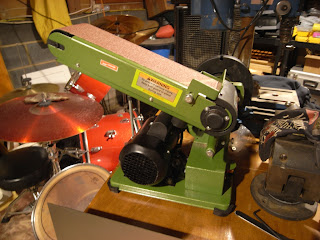
Harbor Freight's disc/belt combo sander. It went together with a minimum of fuss, the bet and disc supplied are actually decent, the belt track straight, and the motor is pretty OK! For the work I did today, it functioned nearly flawlessly. I would like to put some light thread locker on the set screw that holds the disc in place, but that is about it. I've already been researching belts and discs for it, and have found some very reasonably priced, high quality stuff that I will likely purchase through Amazon soon. 

The next bit is harder to see in this picture:


The stand underneath the wood top is the thing I'd like to point out. This one was not so great to put together, but only because the box was not intact and some of the hardware is missing. I'll get that straightened out son enough. It is fairly sturdy and for the price, I wouldn't hesitate to recommend it for light or medium weight things. 

I might have mentioned this before, but this foot switch is really good to have:


I mostly use it with my band saw when it is in the vertical stand. I can start and stop the saw with my foot instead of using a hand. This allows for more control, and when dealing with cutting and grinding tools, control and awareness are paramount!

 The next few pics are of the parts of the box that Pete's engine was shipped in.

I have to say, I am very impressed with the construction. Any time it takes you over 45 minutes to unpack one thing, you know it is packaged to survive anything! heh

I labeled the panels  and the frame as I took them off to facilitate putting everything back on when it is time to ship the engine back to Pete:


Top of the frame:


Side view of the frame with the engine nice and snug inside its wrapping:


Once I got it out, I set about cutting these:


from threaded rod purchased from McMaster-Carr. (M12x1.25!)

Having chopped them to size in the bad saw, the ends needed some smoothing, so it was time to put the new sander to work!


Talk about quickly making a nice, smooth end! I love that sander! 

If you'll notice, though I am not happy with the amount of crud and muck on the rod. I ran a a tap over the threads to clean everything up:


ALWAYS lube taps and dies, even when just cleaning threads. ALWAYS. 

Here is the difference:


If you are curious about measurements, I made the shorter blind-hole studs 4.25" and the longer through-hole stud 5.5"

I made the long one long enough to double nut the end, like this


You'd also be wise to notice that I have a washer in between the stand leg and the block. Most cheap engine stands aren't finished well, and I would rather have a smooth washer against the block than a poorly finished tube. Little things like this make a difference!

Artsy shot:


Once I got the block mounted on the stand, it was time to put on Pete's pan:


 I stole two studs and nuts from my SOHC engine, which took a while to do since I didn't want to ruin those small studs and took the time to clean up the threads so that they wouldn't booger up Pete's nice and newly machined and cleaned block! Taking care of threads takes time, but it is much less time than repairing a thread that gets boogered because of lack of care. 

More views:


I have to ask Pete who made this plexi cover:


I really like it! Of course it has to come off for putting the head on, but I think it is a great idea to have to keep the mating surface on the block in good shape!

Now here is where things get a little goofy:


Yes, that is a ratchet strap holding the head and block together. I totally forgot that I didn't have any dowel pins or extra head bolts . . . Duh. That will be taken care of soon enough, especially since I want to get the head indexed correctly before making any serious commitment to a particular measurement for the primaries or downpipe (in Pete's case). 

This is where the block came from, recently:

I have to say that I am EXTREMELY impressed with the sleeving job. I like the design and the fit and finish is, as far as I can tell by visual inspection, extraordinarily good! This engine is being built so well!  I am just glad to be a part of it. =)

Some other block markings that I just liked enough to take pictures of:


The oil inlet caught me a bit off guard:


I haven't seen one like that before, or at least not that I've noticed. If I remember, I'll grab a pic of the same spot on my SOHC as it is quite a bit different. 

On to more fun stuff! The flange needed some clearancing:

More was needed on the timing belt side than the passenger side, but having the belt sander make quick work of it:


Now it might seem like I am going to brag about something, but, I'm really not, at least not at the moment. Take a look at this:


The gradations closest to the front of the picture are 1/64". That line is supposed to be on the 1/8" line. It's less than 1/64" off. So, why am I making such a big deal out of this? Because this is me being INACCURATE. Normally, I would obsess over getting things even more precise, but, I am realizing more and more that sometimes your tolerances don't need to be quite as close for most things . . . (Except for fitup for TIG welding. heh) The point here is to know what you are doing an what is necessary. Getting to caught up in details can stall everything. There is such a thing as "good enough at this time!"
The lines above were for installing a clamped fence to cut these: 


Which I finished in record time thanks to the new sander. I am still not happy with how much work it takes to match the sides up, but I have some good ideas on how to improve on the process in the future, which is good because I will have several more headers and manifolds to make the rest of the summer!

Of course, I HAD to show this thing off again:


I LOVE it! The ink is different than normal Sharpies, too. It takes longer to dry, or, at the very least goes on thicker an makes for goo score lines:


I didn't get to take pics of the last couple things I did, but it was mostly some layout prep work for finishing up Mike's bike and something to make my life easier when doing this next header. 

Tomorrow will be a busy day. Dave and I are going to venture forth to exchange my bottle (it is finally near its end), pick up material from McMaster-Carr and I think we'll actually finish his header! I'll be finalizing the layout for Mike's seat pan and battery tray, triple checking my measurements, and that will be ready to get done soon, too. I am going to have to stop a bit earlier than usual as I am going to be the door man at a bar for a gig. A few bands are playing and the music alone makes it worth getting in for free. The added bonus is getting to be imposing, handling a large wad of cash and being nosy. All things I like. LOL!