Tag Line

"Built Dam Strong!"
Showing posts with label divergent cone. Show all posts

22 August 2012

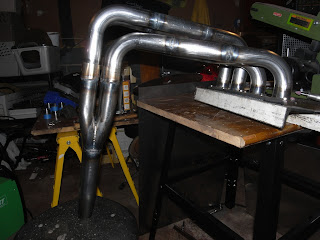
DYNO RESULTS OF MY CUSTOM HEADER!

I spent this evening using the power of the interwebs to remotely dyno tune the car that has my custom header. This was the first time I had done this. It was exciting and annoying at the same time. I couldn't see everything in exactly real time, but, it was a huge step up from just getting a datalog file sent via email. I could see where the engine was in the timing and fuel maps in semi-real-time. This was a huge help to get my brain wrapped around what needed to be changed. At the end of the evening, we ended up extracting over 10WHP on an already potent package that had been tuned via feedback and datalog. Given my familiarity with this engine, the final timing curve was only off from my guess by at most 2* at WOT.

Here is what I can say about the engine:
It is a DOHC D-series. It has my custom header on it. (See THIS LINK for more info, and also search around for more pics of the thing and design theory.) I tuned it. The engine has more power to gain, especially if it is revved higher. The engine is extremely easy to tune with no stupid peaks, no issues. The AFRs are extremely consistent and it pulls very cleanly through the RPM.


Rather than focus on the numbers, look at how darned flat the torque curve is and how close to linear the power curve is:


YES it is a crappy copy. No, I can't an won't post more of the chart. 

The scaling of the torque curve is also wrong, due to an issue with the dyno coming out of sync with the RPM. The dyno computer thought the car was revving to 9200RPM when the team was doing pulls from 2500-7500ish RPM.

Also, this was done on a Dyno Dynamics dynamometer. I mention that for the people who know about them. Those that don't and obsess about numbers, you can make fun of the WHP, but I will take this as a huge validation of the general design of my own headers. I will take feedback from this team and improve on what I can do and make things better than before. 

I have been smiling with this success the whole evening, eager to share the results with people who have known about this project, and now I share with you!

07 June 2012

I finished my first complete header today!
First things first . . . A shop isn't a shop without good tunes. For the past few months, I've been listening to muzak (I generally listen to mostly bad music) while working via my lap top or my cell phone, neither of which are particularly pleasing to the ears or clearly audible over my TIG welder's fan that is constantly on. (The on thing that really irks me about that welder. heh) I made sure I got up early and loaded up my speakers and amp:


I've had this stuff for years! The speakers are Alesis near-field monitors. The boxes are HEAVY and ported. I drive them with an Alesis 150W amp (most of the time, sometimes the 500W version I got for subwoofer duty . . . ) and feed them through a normal 3.5mm to RCA adapter cable. At times, I've been accused of having the subwoofer turned up too loud . . . when I don't even have one. The speakers are very efficient to pretty low frequencies, and I really do tend to prefer fabric tweeters since I have a tendency to be overly sensitive to the treble area. It was such a joy to listen to polka (yes, really, at least part of the time) and other music while working!

So yesterday, I left off with this:


It was tacked up and ready for full welding. After fiddling around a bit trying to figure out the best way to position the header for welding, I got an idea. The stock exhaust nuts, while very robust, are rather large and get in the way of the TIG torch. Why not figure out a way to reduce the profile of the bolts that were holding the header to the jig? So, I did! Below is a pic of the M6 threaded rod, washers and nuts (all stainless!):


The stock exhaust stud is an M8 size, and in the following pic you can see the clearance difference rather easily:


This made a good difference in clearance and ease of welding around the tubes. 

Here you can see the header mounted on the c-channel jig:


This makes for a much easier time of welding everything since you can move the jig and header around to make it easier to weld the difficult spots! Even so, I was getting stuck in a few places as I still have the long back cap in place:

A bit more shuffling around easily took care of that last little bit, and that was no where near the hardest part that I had to weld. 

I think this is after everything was welded, as I didn't get many "in process shots" since I was busy working over under around and through the primaries to get everything welded:

In the afternoon, new goodies arrived! I ordered some Norton sanding belts and Mirka stick on discs. The Norton belt is likely coming off soon because of this:


It is terribly ironic that the cheap belt that came with the thing tracks perfectly strait while the high quality (Norton makes many of my favorite abrasive products!) belt just rams straight into the side, creating a lot of unnecessary friction and slowing the whole thing down.

The next items to show off are the router speed controller, which works, at least with no load on the motor and a digital optical tachometer. I could test the tach out today as I didn't realize that the thing took 9V batteries, and I have none of those. 


The tach works optically. It requires a piece of reflective tape mounted onto the rotating thing you want to measure the RPMs of, and then you point the tach at the thing and it simply counts the tape. I mounted the tape directly onto the the chuck:


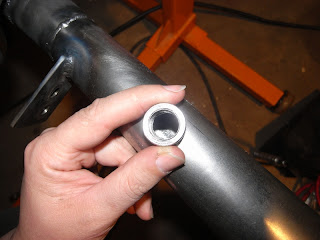
Once the header was welded up and I took the collector off and put it back on (what a pain . . . ) to verify everything was fitting decently enough, I needed to find a way to mount the springs. I came up with a brilliant idea to use this:


The twin of the free bed frame bracket I used to mount this:


To make 4 of these:


Which got sanded down to match, looking like this:


I cleaned up the flat sides, which I should have done when the material was in a large, flat piece as that would have taken much less time, and had two pairs of retaining spring tabs! I didn't even have to drill any holes!

I got the header mounted back onto the c-channel jig ( take apart, put back together, ad naseum!) and figured why not make the new low-profile studs permanent bolts:


I simply carefully melted the threaded rod to the nut and now I've got a perfectly sized nut that will make dropping in and securing things to he jig much easier! 

Here are the 4 finished tabs:


I trimmed the ends of the springs back a bit to make mounting slightly easier without taking the whole thing off:


While the header was on the head, I had marked off where I wanted the tabs to be, so I got them ready for welding:


Trying to tack with those magnetic triangles was weird. The magnetic field was definitely distorting the arc! It was so very weird. But, I managed to get a tack on there and then take the magnetic holder away and then weld the tabs on solidly:


Every once in a while, something weird happens that is still pretty cool. I wanted to keep the tabs 2.5" apart, but check out what the second set of tabs measured to when I just placed them by eye!


Dead on! OH YEAH! LOL!

Here is the final shot of the evening:


DONE! (Almost)

I forgot to clean up the inside of the ports from the head. That is going to be the first thing I do in the morning, then, finish packing it up and get it to the FedEx facility! YAHOOOOOOOOOOOOOO!

Another ironic thing: most of my pretty welds on the primaries are on the backside of the tubes. LOL! 

I learned so much today doing this! I can't wait to move forward and tackle more challenges, and I already have those ready and waiting for me! =) 

03 June 2012

Gifts and gaffs; crazy day all around.

Yesterday was terribly frustrating at the start. NONE of the LWSs (Local Welding Supply) locales were open. WTF? How the heck is anyone supposed to get stuff to work on a weekend? Blech. I have to go tomorrow to exchange my welding gas bottle, which is going to take up a good bit of time that I really don't have. 

Enough complaining about things I can't change and just have to deal with. Dave and I made a heck of a lot of progress despite lack of welding ability. 

Dave came out and brought something really awesome. As noted in my previous blog post, the motor on my Che-ese (cheap Chinese) drill press really was sucking. Dave poked around his place and found a new motor, and what a motor it is! The old motor was roughly 4.5" in diameter and supposedly 1/2 horsepower. The new motor is 6" in diameter and rated at 3/4hp! 

It took some cobbling together, but, the new motor got hung off the press with a bracket I salvaged from an old bed frame that fit almost too perfectly with some quick trimming on the bandsaw. Everything went together so well it was nearly scary. Check it out:


Dave got some pics of both motors next to each other. I didn't get a whole lot of pics yesterday because I was actually working. heh Still, that motor is just HUGE!


The only complication was that I needed to get a new belt. I took some string and got a measurement on the pulleys, took it to a really awesome local auto parts place that was something the likes of which I haven't seen in years (in a good way). We checked out a few belts, and ended up with that green Gates belt you see. I love being able to just talk to an intelligent person behind the counter. When I answered the question "What is it going on?" with "A drill press," the guy didn't bat an eye, asking a couple good questions to figure out what kind of press it was and what I needed in the belt. It was such a change from the blank stare you normally get from the salesmonkies behind a chain parts store counter since all they know how to do is look stuff up by vehicle (and barely even that at times). 

The last two issues with the motor are that the motor, while being insanely smooth and VERY powerful spins too fast, even with the slowest combo of pulleys. I am actually looking at getting a "router speed control" off of Amazon and actually a non-contact digital optical tachometer (super cheap actually) to see if I can tone the speed down to run bits over 1/4" (which was determined experimentally with some scrap to see what the limits were on mild steel). The other issue is the ghetto-rigged wiring. I'm not proud of it, but for now, it works. It will be rectified as soon as is practically possible. I am aware that it is not "safe" but I have done a lot worse and survived. heh

Being excited about a working drill press is great and all, but it's not magically going to make all my projects get finished up on their own! Time to get work done! 

Box of bits to make a header from:

That is going to be put together ASAP since the team that needs the header needs it this coming weekend! They have a race and are going to be breaking in a newly built engine that is going to be wearing the header I build. I AM going to make that happen, no matter what!

I spent a while getting the final merged pieces matched up:

And also matched up the small end of the megaphone to the secondary diameter (1.75" since this engine will leave above peak torque):

I'm actually really frustrated with all the exhaust expanders I've tried. The one you see in the pic above is super beefy, but . . . I have to figure out how to get enough torque on it to actually expand 16 and 18g mild steel. That particular model is rated for use with an impact gun, but I didn't have one on hand and I don't like to make that much noise if I can avoid it. Anyway, I managed to match up the ID of the megaphone with the ID of the secondary merge tubes. 

As always, the bends are excellent mandrel pieces from Columbia River Mandrel Bends. The cones for the magaphone are actually Cone Engineering pieces that they stock. If you ever need a cone that CRMB doesn't carry, you can order direct from them. 

Dave was busy while I was working! Here is the start of the captive flanges for his header:

That is stainless 1/4" thick by 2" wide flat stock. Once we get the speed on the drill press under control, we'll drill out the center hole (likely 1 3/8") and the mounting holes (about 1/4"). 

Dave also got busy working on a mockup for his gas tanks (that will be hidden by the bodywork) using CAD:


He also brought a spare head that he doesn't care quite so much about for obvious reasons: 


I think that one chamber needs a few more red Xs, though! 

The head is going to get used to shape the flanges that are going to crush the sealing copper gasket. 

He was working on another makeshift "table" that we set up so he could have a nice workspace:


 He even managed to get in some time with a grinder smoothing out his swingarm. Proof of him working:

And of him being a complete goofball:


 Tomorrow is going to start off with exchanging my bottle at the LWS and heading to McMaster-Carr to pick up retaining springs for the headers I am building and some aluminum rod to repair a brake drum for Mike's CB750, which I'll get some pics of soon enough. Welding on cast aluminum deserves it's own blog post. I got really good at it due to having to fix all sorts of nasty stuff in the Army. It should make for an interesting write up. =)

18 March 2012

It's DONE! Now the shipping adventure begins.

Justin got back to me with measurements on where to place the O2 sensor bung, so X marks the spot! I center punched the point, as anyone who has tried to drill round stuff knows that if you are doing it by hand, the bit will walk if you don't!


Here it is opened up to 3/8":


I used the bun to trace out how much it needed to be opened up, and it was a bit off from vertical:


I used my hanging grinder and an 1/8" carbide cutter to open up the hole thusly:


Looking good!


I happen to love this clamp! It isn't cheap, but it is very versatile, as it has swivel pads and is tension adjustable, so it will clamp down on anything from the thinnest sheet to up to about 4"!


http://www.lockjawpliers.com/ They are built very, very well. Better than real Vise-grips and faster to use. (Don't get me wrong, I still have and still love Vise-grips, but these things are just that much better!)

Here's the bung welded on:


And here is the finished product in all it's glory:


I had forgotten to get pics of the rest of the collector to downpipe welds:


I actually didn't like how the SS of the original header was welding. I just did the best I could. The good thing is that Justin isn't going to be driving this on the street anymore, and with the new support, I don't think there will be any cracking issues, at least where I welded on the header. heh

I'm getting better, but, still have consistency issues that I have nearly figured out:


Really concentrating on what was going on, I discovered that I am simply not rotating the torch enough. On small diameter pipe, the motion needed to keep the weld puddle consistent seems REALLY exaggerated, but it isn't. Once I realized that, my welds immediately became more consistent and regular. I will be using these techniques on my next several manifolds.

Now, how does one ship something so dang funky? Creatively and carefully. I wasn't going to find a normal rectangular box that would just work, so I made my own from Ikea desk box halves.

Here's the bottom piece, and me trying to figure out how best to do this:


I figured that my best bet was a clam-shell case, so, I started taping in foam supports to keep the header of the sides of the box and to keep it from pocking through, and also bent and taped the remainder of the box up in the back to make part of the tall side:


I stuffed in more packing to keep things in place in case of the worst disaster (I KNOW how "stuff-chuckers" work!):


Then I basically did the same thing for the top, and got it all connected and taped up:


I added sides to the box and then scribbled "THIS SIDE UP" on the top, and a few snarky comments on the rest of the box:


The lady at the FedEx office got a total kick out of the box and the attempt to have the box stay upright. She even had me plaster the box with "THIS SIDE UP" stickers that were bright read. She was laughing the whole time at my snarky asides on the box, and even offered to use some really wide packing tape to reinforce the corners, since she really liked the box. She also said that since it was a bit awkward and out of the ordinary (most of the weight is on the wide side), along with the placement of the address sticker and the "THIS SIDE UP" stickers, she thinks it has a good chance of getting to Colorado intact. We shall see . . . If the worst case happens, I declared a value of $499, which is more than enough to make a new header from scratch . . .  (I'm sneaky like that).