I'll start off with a shout out to my friend Remo who sent me the above "new" torch! It is a Weldcraft flex head with a large gas lense setup. It is a lot different than the previous torch I was using. I am not sure if I actually like it yet, but, I will keep trying it out to give it a thorough workout.
I put it to good use finishing up Dave's header!
That is a 70 something Honda CB350 that I've done a bunch of odds and ends to before, and FINALLY finished the header, which is the second to last major fab project left to do before it is all up to Dave to get back together.
The pipes nearly all tacked up:
For those of you, who like me, are motorcycle retarded, the frame and engine are flipped upside down. heh
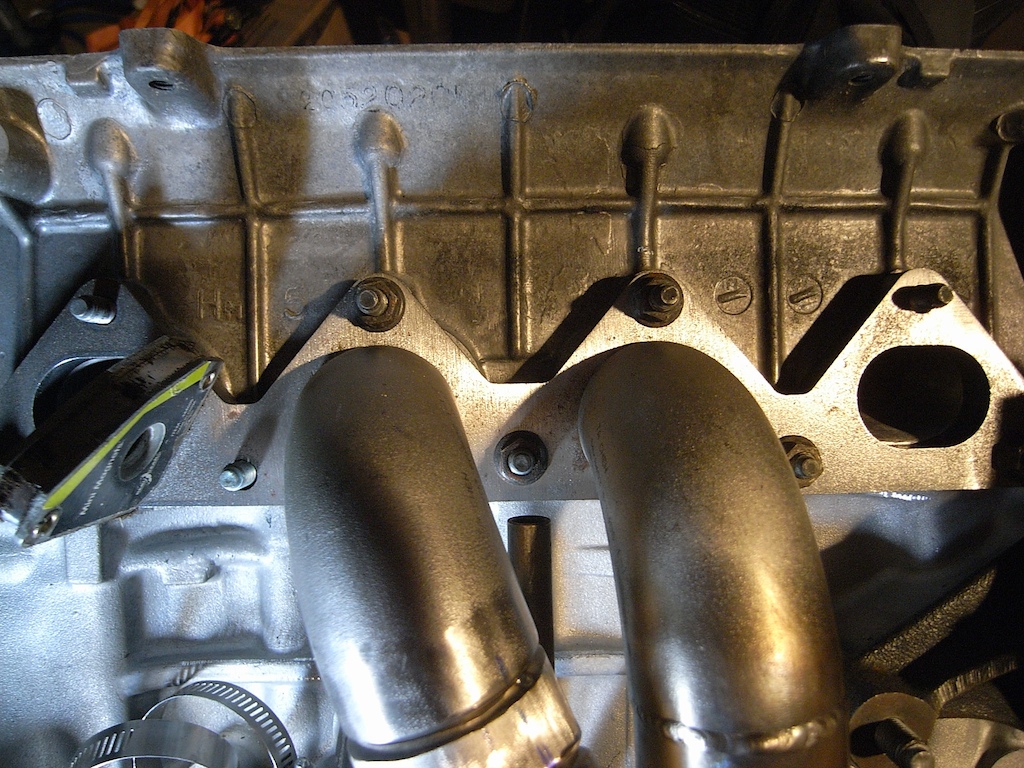
Here is what happens if your fitup isn't exact:
It isn't horrible, but, get your fitup as good as you can so you don't have to deal with silly crap like that.
Nearly completely tacked and ready for welding:
We raided the kitchen for some aluminum foil:
Why the foil? It is cheap, works well and doesn't leave a sticky residue like the foil tape (which still has its place, though, so don't think I'm JUST being cheap), which prevents a whole lot of cleanup.
It looks like I should have turned up the gas a bit more:
But at least I was starting to stack dimes.
Here we were getting a sense of where the tailpipe needed to go:
I squished the end of the tailpipe and flushed the collector off at the necessary angle, then tacked the tailpipe on:
Above and below you can see how I formed the tailpipe to the collector:
It was a bit crude, as I took a cold chisel and bopped the tailpipe until it matched up. It is a bit trickier than that, as you have to tack the pipes together at the right spot, then apply directed pressure at the right spot. You can use anything with a blunted edge or even a drill bit, but, a cold chisel was handy and yeah, it left some marks, but, it got the job done!
The other fun thing about welding a header off the engine is how much it moves. The two primary tubes moved (ONLY!!!) about 3/8" together. It makes for an interesting time getting the header on, but it is still manageable. If I ever make more of these, I'll have a jug set up to prevent that from happening as much.
Being lactose intolerant with an inherent love of dairy ensures that. But, today, I ran out of Argon. So, tomorrow or Friday I will have to make a trip to my LWS (Local Welding Supply, or in my case, not so local, or even open on Saturdays anymore . . . grrrrr . . . ) and exchange my 300CFH bottle.
Running out of Argon should imply that I was welding a lot. I was!
Today's goal was to completely weld up the other runner of the "inner" section of he manifold, so I got crackin'!
First up, taper the joint that I had cut in the 45* el, as started out just plain flat:
After that, it was time to finish up the inside of the other runner since it is way easier to do that when you don't have things in the way! Setting up the purge:
Section to be welded:
My friend Remo sent me some tape he has used:
This stuff RAWKS! It is way better than the other foil tape I was using before. I'll get into it more shortly.
I also decided to first fuse the pieces together:
And then run a cover pass:
I think it turned out pretty well.
The next bit of work involved more fitup. I couldn't take pics as I needed all available limbs and appendages to get things lined up and marked, but, I finally did that and started tacking:
After more cleaning and tacking and cleaning and tacking and purging and cleaning and tacking, etc., I check the fitment:
Caching!
I took the next picture to point something out:
Keen observers will notice that the pipe and el are slightly different diameters and that the el is offset towards the right in the picture. While this might not "look right" from the outside, the inside is the part that matters. Gasses/fluid will "stack" on the outside of turn, and it is always best to keep the outside of turns as smooth as possible to eliminate as much friction and turbulence as possible.
Fusing!
I also took the time to "graduate" to a shorty cap since I will be getting into more complicated stuff soon enough. I don't like short caps because you have to "waste" tungsten by chopping them roughly in half, which increases costs and uses up more of the tungsten more quickly.
Now, here's the reason why I like the EZTape:
NO RESIDUE, even after welding for a while on the thing and it being darn hot.
Internal shot as best as I could, though it is not focused on the right spot:
External pics of the fusion welds:
Closeup:
Now, a note about purging. Argon is heavier than oxygen. Typically, you want to introduce the argon into the enclosed space so that it sinks to the lowest part of the interior of the weldment and then "floods" the weldment until all the oxygen is "floated out." In order to do that, you need to allow the oxygen to escape. Note the holes:
Since I wanted to make sure that all the oxygen was displaced from the runner I was welding on, I made sure to allow the argon to flow through that runner the most.
The holes also allow excess pressure to vent. If you get your weld hot enough and don't vent the pressure, the hot, molten metal will be forced out of the puddle from the inside, sometimes explosively. Having hot metal spewed at you is NOT fun. (I have the scars to prove it.)
After I fused the pieces together, I started capping them. I didn't do a perfect job mostly do to the fact that I need thicker filler rod that doesn't melt back from the puddle so quickly and it threw my timing off something fierce. No excuses, though. I'll have to run another cap pass to fill in the undercut:
After a super busy day, I got in some more welding. I am starting to get the hang of welding this thick stuff. I have resolved that I need to get some slightly thicker filler metal as the thin stuff I have now is melting back too fast for me to keep up a good rhythm. I'm still improving and will keep it up!
I start out with cleaning. I used acetone to get the residue from the sticky foil tape off the merge pipe then sanded it with sandpaper on the outside and a cartridge roll on the inside. The inside needs to be cleaned, too!
I was tying to make my life easy but clamping this in my vise:
But I realized I really didn't want to try grounding the whole thing through precision machined jaws. I also totally forgot that the el needed to be cleaned up, too!
After I took it apart and cleaned up the 90* el, I changed game plans and got my (still less than ideal) purge setup installed and let the gas flow!
Here's a close up of the clean up:
I tacked the pieces together, checked fitment. Again. And again. And then I got down to welding!
I'm starting to get the hang of it:
When I was wrapping around the sides, I ran into some undercut:
I will fix that for sure, but after I tack the other side together. I was starting to scorch the blue tape holding the joints together on the other side. I'd rather they not come apart just yet. LOL!
More undercut to be fixed:
After the other leg is tacked up, I'll finish welding that section together.
Why do you backpurge? To get a clean inside joint, like this:
No, it isn't fully penetrated, but there is no "sugaring" of the backside which is basically oxygen contamination that will eat away at the stainless from the inside out, especially when exposed to very high temperatures found in it's intended application!
Today was a busy day. It might not look like I got a whole lot done, but, when you are working with a tough material (Stainless Steel is a heck of a lot tougher to work with, and tough to work with correctly) in a new format (I've never worked with schedule 40 bends and pipe before), you have to go slow and take your time to get things to fit well in a manner that will flow well, especially when it comes to turbo setups.
Enough whining! On to pics!
The last time we saw stuff for Pete's manifold, I had made a few important cuts. Here's a refresher pic:
I couldn't take a lot of in process pics, but this is what I ended up with after way too long a time getting these two pieces to fit together in a decent low angle merge:
As you can see from the light leak, it isn't a perfect fit:
But looking at it from the important side (the inside):
After a bit of cleanup, both legs are going to flow very, very nicely!
Once I got the pieces fitted up decently, it was time to clean everything up in preparation for welding. I use my hanging grinder (click HERE for more info on which grinder I use) and a roll cartridge that was fresh and never used on anything else. Here are the results:
A closeup of the texture left:
Then it is time for some really deep cleaning:
Use gloves!
Acetone is really nasty for your body. It absorbs into your skin and is not a good thing to force your body to deal with. Also, the oils from your skin can contaminate the weld and lead to rusting. No, that is NOT an exaggeration. Some people's skin oils and salts can leave rusty fingerprints on stainless. It isn't a fun thing to see on your otherwise shiny stainless parts. LOL!
To wipe everything down you can use clean rags or paper towels, but I don't have rags, so I just use:
Remo (a guy I know) is going to kill me for not having a diffuser on my purge hose . . . but I haven't made one yet. LOL!
This turned out to be a bad idea. LOL! The hose started melting once I got to welding.
You can't block off all the piece. You need a place for the air (and specifically Oxygen) to escape as the argon fills the pipe. So, make sure you leave some place for it to come out at the very top of your workpiece!
I really need to make a "third hand." Check out this video by Jody at weldingtipsandtrick.com did to show his improved "third hand:"
The back side is taped:
I tacked it on one side, then taped that side up:
I had to smack it with a hammer to get the pieces to line back up. If you have never welded on stainless . . . you have NO idea how much that metal can move. It is CRAZY!
Since I had my hands occupied, here is the finished piece:
Most of the discoloration outside of the actual weld is the residue from the tape. The manifold is going to be sandblasted in preparation for ceramic coating, otherwise I would be a bit more attentive at cleaning that stuff up. Pete evidently likes to shift dirty things, so this is my little bit of payback. (JUST KIDDING, PETE! LOL!)
Weld closeup:
Since the fitup isn't perfect, the beads aren't really all that wonderful looking. This is the first time I'm welding this stuff and I'm no dummy so I starting with the pieces that are hidden in the back out of site. LOL!
I had a heck of a time figuring out how to mock up the rest of the stuff since I have two hands and the clamps that I have, while useful, aren't exactly wide enough to completely support the weight of the pieces of this manifold. So . . . I got creative:
I found some tube that slip fit into the straight pipe very snugly. I discovered that the ID of the els isn't exactly the same as the ID of the pipe, so I had to get even more creative and cut out a slice from the tube an ended up with this:


.jpg)


