Geez that's a long title for a blog post. Oh well. Names are what they are. Hah!
Let's get to finishing up the master cylinder bracket!
These angles are the bracing for the bottom of the bracket:

After drilling holes where they belong, it looks something like this:

Checking fitment, more room is needed to clear the hardware:
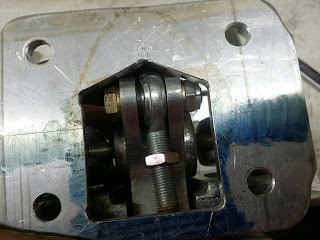
 Dangit! At least it is an easy fix.
Next up is some further bracing.

There wasn't much of a solid connection between the back plate and the bottom bracing angles, so I wanted to add in enough material to get a really solid connection between everything.
Tracing the cardboard onto the 1/4" aluminum:


Choppity chop with the band saw:

And . . .SHAZAAM!

Now this is starting to look like something serious:


I had acquired this really, really good flow meter from work (it was ordered by accident as we only used heated flowmeters to prevent icing at the VERY high flow rates we use for the industrial welding we do) and I wanted to try it out:

But . . .
 Dangit! I still need to get an adapter to be able to use this thing. LOL!
Always check fitment!

Weld, weld, weld:


Testing different settings on the TIG box:

Again, testing for fitting because I figured this would happen:

Hitting the corner with a flap wheel solved everything:


Nice and snug:

Another view of the trimming of the "wings":


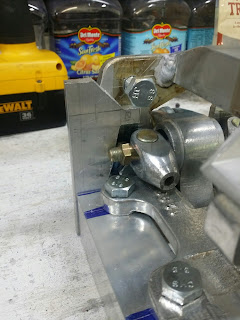
And finally in place!
 That sucker looks pretty dang good sitting there!
Ed wanted to add in more stiffness by bracing the mount to the frame rail on this side:

But first, more test fitting!

I love how the master cylinders look:


On to the bracing!
I wanted to extend the bracing as far forward as possible without interfering with any of the mechanicals.
 This increases the moment arm which will resist more force as applied when the brake pedal is pressed.
I trimmed the one side of the angle to match the angle of the frame rail:

Not content with just bracing one side, I added in this smaller angle:
 Achieving the right fitment of this smaller angle was actually pretty tough. I didn't want it to interfere with access and I wanted to keep it as short (and therefore as stiff ) as possible.
Here's a close up of the corner I worked around:

Once I was happy with how everything sat, I clamped the extension in place:

Then got to welding:


Here you can see the annoyances I had to clear:
 Covering one of those bolts was is not good engineering practice. It would drive me batty if someone had done that to me!
Tack and check again!


Weldy weld!


Not so pretty but, it'll hold:

Finished product!


NOT! In keeping with the theme of adding lightness, this part could be trimmed off with no detriment to structural integrity:

We changed over the regular hex head bolts for some cap head screws:

This gave is a bit more clearance for taking things apart as a long hex key is way easier to fit back there:

Next up, I tacked nuts onto the pedal assembly in the harder to reach holes:


 Yes, the Nyloc melted a bit. Oh well. It still works.
I did this so we didn't have to hold the nut in place and could simply start the screw and not have to reach through the eventually installed windshield to installed the whole assembly. That would be annoying.
Here's the pedal box with the mount:


 And that's it for that long project!
On to another quick thing to finish the dash:


Ed wanted the reservoirs for the brake fluid to be visible from the driver's seat, but not get in the way of the forward field of view. This positioning fills the requirements perfectly. They aren't too hard to get to, either, especially with the windshield out.
That's it for this installment! Thanks for reading!
Let's get to finishing up the master cylinder bracket!
These angles are the bracing for the bottom of the bracket:

After drilling holes where they belong, it looks something like this:

Checking fitment, more room is needed to clear the hardware:


Next up is some further bracing.

There wasn't much of a solid connection between the back plate and the bottom bracing angles, so I wanted to add in enough material to get a really solid connection between everything.
Tracing the cardboard onto the 1/4" aluminum:


Choppity chop with the band saw:

And . . .SHAZAAM!


I had acquired this really, really good flow meter from work (it was ordered by accident as we only used heated flowmeters to prevent icing at the VERY high flow rates we use for the industrial welding we do) and I wanted to try it out:

But . . .

Always check fitment!

Weld, weld, weld:


Testing different settings on the TIG box:

Again, testing for fitting because I figured this would happen:

Hitting the corner with a flap wheel solved everything:


Nice and snug:


A bit more welding:

And some more cleanup:

And finally in place!

Ed wanted to add in more stiffness by bracing the mount to the frame rail on this side:


I love how the master cylinders look:


On to the bracing!
I wanted to extend the bracing as far forward as possible without interfering with any of the mechanicals.

I trimmed the one side of the angle to match the angle of the frame rail:

Not content with just bracing one side, I added in this smaller angle:

Here's a close up of the corner I worked around:

Once I was happy with how everything sat, I clamped the extension in place:

Then got to welding:


Here you can see the annoyances I had to clear:

Tack and check again!


Weldy weld!


Not so pretty but, it'll hold:

Finished product!


NOT! In keeping with the theme of adding lightness, this part could be trimmed off with no detriment to structural integrity:

We changed over the regular hex head bolts for some cap head screws:

This gave is a bit more clearance for taking things apart as a long hex key is way easier to fit back there:


I did this so we didn't have to hold the nut in place and could simply start the screw and not have to reach through the eventually installed windshield to installed the whole assembly. That would be annoying.
Here's the pedal box with the mount:


Man, it just looks good installed:

On to another quick thing to finish the dash:


Ed wanted the reservoirs for the brake fluid to be visible from the driver's seat, but not get in the way of the forward field of view. This positioning fills the requirements perfectly. They aren't too hard to get to, either, especially with the windshield out.
That's it for this installment! Thanks for reading!
Please leave me feedback either here or on my Facebook page, which you can find by clicking this link: Beaver Built on FaceBook
You can subscribe to receive new post notifications by entering your email in the box on the right of the article, by RSS feed or by FaceBook.
Thanks for reading and I hope you find this stuff useful or amusing or both. =)
No comments:
Post a Comment