Tag Line

"Built Dam Strong!"
Showing posts with label 2008 Fit Sport. Show all posts

18 September 2014

Fit Fit minor update: securing some wires securely.

Two of the new additions to my fine toaster (appliance, commuter car) have been very useful. The first is a power port doubler that also has two USB charging ports and the second is a Bluetooth adapter that offers some unique and very useful features. (I'll go into that more later in a separate review.)

With the wires and widgets installed in a functional but honestly sloppy manner, the rattling and slapping of wire against my knee while driving came to be too much, so, I took some time looking for solutions that didn't involve tape, JB Weld or hot glue.

The first fix involved some actual, literal industrial strength Velcro brand hook and loop fatten fastener self-adhesive tape:


I cut a short section and stuck it onto the charging adapter and secured it thusly:

It fits rather well there! This Velcro stuff is really good so far. It has very good grip strength and the adhesive is very sticky. I just wish it had come in black. I'm fairly sure I ordered black, but, the gray isn't offensive in the least. This takes care of the major rattle source.

Next, I looked for a compact wire holding solution that wasn't white or sickly off white like many cable holders seem to come in. I found some clips with double sided sticky tape that seemed to fit the bill. The amazon reviews showed some dissatisfaction with the pre-applied tape, but none with the clips. Since I'm not above improving things, I figured I would try the tape as supplied and see for myself how it holds up to the rigors of automotive use. On to the pics!
This is the annoying wire:
No, it isn't the biggest deal in the world, but it does swing around enough for me to notice while I'm driving. I usually seek to minimize distractions while driving, and this is a really simple fix, so Yay!

These are the clips:
They come 20 to a package:

Installing them is a bit fiddly. The tape is certainly not as good quality as the best 3M stuff, but, it seems to stick if you press and hold them in place for half a minute. Again, we'll see if they hold over time. The biggest part of keeping them stuck on is to put them where they are not under any strain but still guide the wire. This goes for larger wires and even piping things in the engine bay. Work with the material, not against it. Things will last longer that way.

Here is a look at the clips installed:
They are all out of the way and prevent the wire from swinging willy nilly into my knee. Cool.

Then I decided to really test these thing's capacity:

That is the pretty thick 6' long USB charging cable that reaches up to my phone that is on a window mount right next to the pillar. It was a bit of a struggle, but they clip on. I would not want to clip anything thicker than this with these, but, the hold on to the wire very securely without pinching it too much.

Here's how I ran the cable with the clips:
So far, they are all still stuck on, even after the chilly temps we had in the area. I'm surprised that they are keeping the thick USB cable in place, even if I did use enough of them. If they hold up for a while, I'm going to use them to properly secure the cable all the way over to the window mount.

Hurrah for cable neatness! 

05 September 2014

The Fit Fit update: Dashmat installed, initial review

Sure, a lot of people think of the 70's and velour when you mention most sort of dash coverings, but, in the case of my Fit, there is a huge amount of glare from the mile wide dash. I guess I'm sitting at the perfect height to have the sun bounce off the dash, reflect off the inside of the windshield and the smack my retinas with a 2x4. It is just one of those unhappy coincidences that seem to happen more often with how cars are shaped these days.

That being said, I took a chance on a dash cover from DashMat. It took a while to arrive, which was noted at the time the order was placed. I took it out of the box and laid it flat overnight, as was recommended. First impressions were that it looks good! The edging is well done, being consistent all the way around. The material is rather handsome with a subtle pattern.

I cleaned my dash off with a Simple Green solution and got to laying out the thing on the dash.

It honestly didn't take much fiddling to get it to lay well.


My only complaint is where it covers the gage pod:


I forgot to get a close up, but you might be able to see that the edging pops up a bit. That seems to be because the edging isn't "finished" on the inside, so the material past the stitching is frayed, pushing the edging up a bit. That might relax after a bit. We'll see.

Now I'm sure you're wondering if it was worth it? Yes! There is no more glare on the inside of the windscreen except from the defrost vents, but that is so low, it isn't a bother at all. I'm going to also state that I actually like the look quite a bit! The quilting and edging are gid looking, at least to me. My only cosmetic complaint is that the "hatch" for the passenger air bag is there. Since I can't do anything about that and the edges appear good, I can live with the compromise.

Overall, I like it. It works for what I need it to do and is good looking doing it. Yay!


04 September 2014

Fit Fit update: brakes are in. ABS warning light is on. Brilliant.

I did manage to finish up replacing the brakes and studs least week, but I haven't posted on it as I've been busy with other things. The job isn't complete, but, I'll fill you in on the details in a bit.

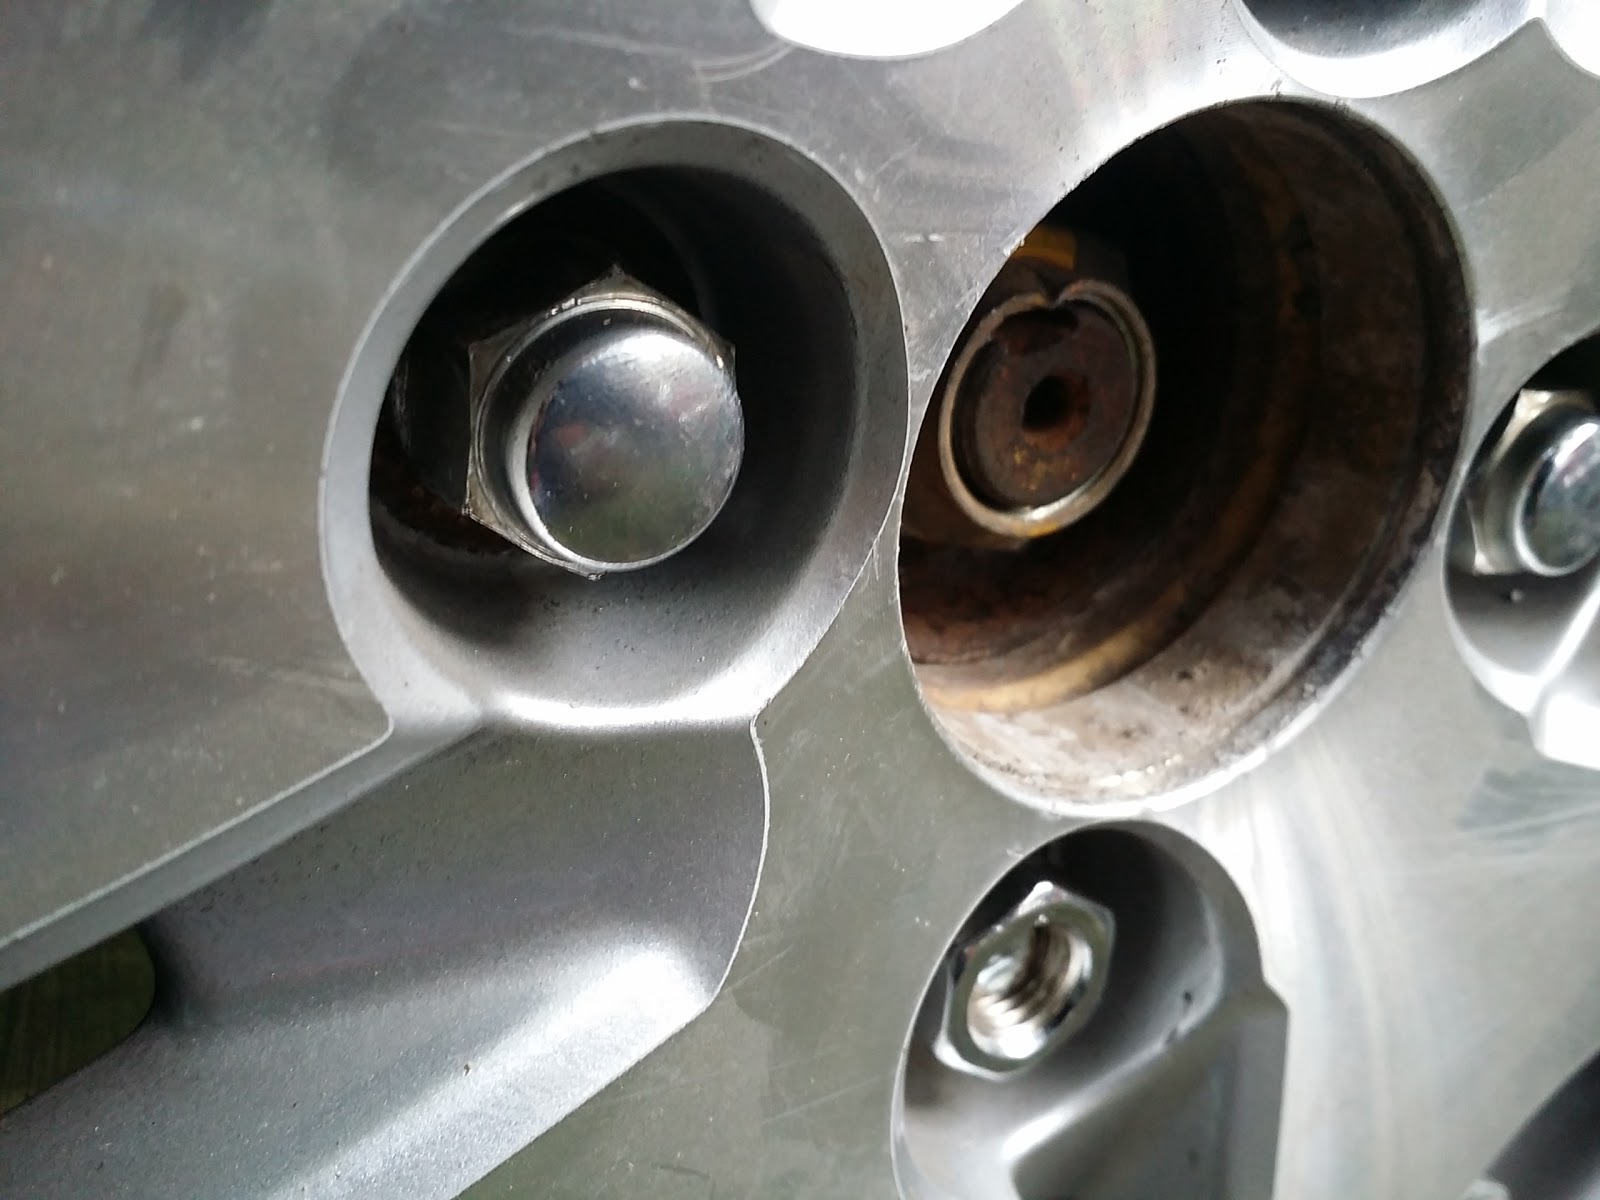
I'm pretty sure I know why this whole mess happened in the first place. This is a close up view of the stock rim:


It is very difficult to get your fingers in the to start the lug nut by hand. This is very easily solved by using a deep well socket to start them by hand, then get your assistive tool on them and go to town. If you just slap the nut on the lugs and go, you will cross thread stuff. Some studs are designed to prevent this with an extended tip (like the ARP studs), but for normal studs and even the fancy ones, start the lugs by hand. Always!

To finish the job on the other side, I rented a hub puller kit. The only thing I used out of the kit is the smaller pulley adapter which didn't fit exactly correctly, but it worked well enough with my slide hammer to pull the hub out:


I got the axle out and re-bolted the spindle in place in preparation for getting the bearing out:
 Dorman part number for the studs, also good for the CRX:
 Everything was going smoothly until . . .
 Yes, I pressed the stud through the square hole of the socket. Der!

 I just used a CRX stud:
 Now THIS tool is super useful:
 Horrible Freight's wheel bearing puller. It wasn't cheap, even on sale, but it let me get the job done without pulling the spindle off the car, though it caused an unexpected problem, though that was my fault, not the kit's.

Installing the new bearing:


This part of the install went very well
The tool works as designed. The issue is that somehow the magnet in the back of the bearing got boogered up. I'm not sure how it happened. Mayhaps I should have selected a larger backing plate to draw the bearing in and it cracked the magnet? I was trying to avoid the ABS sensor as it sticks out into the space  between the bearing and the axle so I choose one that gave me room. I likely could have gone larger. Or, maybe I should have gone smaller so that I just hit the inner race of the bearing. The brake warning light and the ABS light are now permanently on, which is seriously annoying I'll be replacing the bearing and both sensors soon. At least I know how to do this and it should take much less time.

Here's the part number for the replacement lug nuts I used:


They are made very well. They are not closed like the stock ones are, but for now, they work well and were not at all expensive.

So far, the brakes feel decent and stop well. The engagement point is a bit low, but I do want to bleed the brakes and adjust the rear drums. Both should help the feel, though that says nothing about the ease of stopping. When you get serious with the brakes, they work very well and are very quiet and smooth. Hurray for good brakes! 

26 August 2014

Why, yes! I love it when people cross thread lug nuts and hammer them on with air tools!

Some of you know that I bought an '08 Fit Sport in what I'm calling ugly orange, though it isn't really too ugly or too orange. This is intended to be a simple, efficient and bearable daily driver, allowing me to have the time to fix my CRX correctly. I had it inspected on Saturday and it was given a clean bill of health with the exception of needing new front brakes, which I already knew from the pulsing pedal and overall poor condition of the rotor faces. No biggie! I ordered my favorite Centric Premium rotors and some Stoptech pads to try and set to work after work installing them.

Normally at this point in the story, everything gets really boring. A simple rotor and pad change should take less than half an hour. Queue dramatic music! But then, as you may have surmised from the title of this post, I sheered of three studs on the driver's side and one in the passenger side.


Blankity blank blank blank blankety blank blank blank. Blank. I've used all my sick/personal days this year, and now with work being slow and having a car note to pay, I really don't want to be taking time off, especially dealing with a supposedly simple daily that will receive correct but really minimal attention, just like a good toaster. So much for that idea.

I made a bunch of calls and managed to find a store with two wheel bearings in stock. My dad picked them and a bunch of studs up on his way home after work. Meanwhile, back at the farm . . .

I got to work cutting the darn rotor screws of the hub. Ugh. I really don't like those things.

A view of how things looked at that point:


By the time my dad had returned with parts,  had managed to pull the hub off with my basic slide hammer kit but couldn't get the bearing out.


I really didn't want to take the spindle off as usually the camber is set by camber bolts at the bottom the shock mount on cars with struts. Meh.

 This almost always gets stuck on the hub when pulling the hub:

 Notice the form of the hub:
 I'm guessing they ate trying to cut down the weight of the hub by doing that, but man, that looks really thin overall compared to earlier hubs. I just wonder how close is too close!

Another discovery:
 Stock CRX studs are the same as the Fit studs.

After getting to this point:
 I spent some time trying to find a wheel bearing puller kit. I wasted a lot of daylight on that mission, including making a very wasteful trip to see if someone at a parts store actually had a clue. She didn't. All they had was a hub puller kit, which I don't need with my slide hammer. Grrr . . .

While I was making calls, I took a look at the SKF wheel bearings and made a discovery:


A magnetic ring! Inside the box was this notice:
 I have no idea how to rotate that on my phone. Sorry. Anyway, that's pretty cool that a simple magnet it used for the ABS and traction control. I'm betting it is cheaper and likely even more reliable that a classic tone ring/toothed wheel.

New studs pressed into to the hub:

After the wasted trip to the parts store for something that no one has, I decided I'd just go ahead and take the spindle out, camber bolts be darned to heck! I did scribe a live in both bolt heads, but I was pleasantly surprised that no camber bolts are present in the shock mount. I'm guessing that they are actually on the inboard side of the list control arm. The only other issues was that the ABS sensor was not coming out. At all. I cut the wire and had to drill out the remains of the sensor:


After that, things went mostly smoothly. I pressed the old bearing out and the new one in:
 The hub was pressed in. Everything was bolted back together. Driver's side done!

Have I mentioned how much I hate these screws?

I had no choice but to grind those heads out. I honestly don't know what time it was, but it was late and I hope I didn't cause any sleepless nights . . . 

I got the new rotor and pads installed. You'll notice I am not saying anything about fixing the broken stud. I didn't. I was too tired wanted to not have the whole neighborhood string me up for waking them up. For more, I have three nuts on that wheel. I'll survive. 

After a final check, I bedded the pads in, cleaned up and . . . Slept straight through my alarm. Ugh. At least I didn't wimp out and take a day off. 

The brakes are smooth and quiet. They work better than the crusty old stuff. They'll be even better when they finish bedding and curing the resin, but I'm satisfied with how they are now. Yay. 

Now I have to figure out how to stay awake at work today . . . Ugh.