Yesterday, I got a huge metric tonne of work done. Dave arrived in the morning and we set to work on his CB350 and Mike's CB750. Best get to the pics instead of jabbering on about what we did when you can see the work.
Oh! The next few pics are from earlier in the week and I hadn't had a chance to upload them yet, so I'll go in chronological order.
Here is a view of the inside of the vertical brace on the front piece of the seat pan for Mike's CB750:
The angle is a bit funny, but you can see that the center line of the vertical brace matches the center line of the seat pan:
I did this to try to ensure that the seat pan would stay longitudinally aligned with the frame.
Here is a view of the rear seat pan and rear vertical brace:
I started out with this:
And ended up with lots of these:
The welds came out pretty darn well on the edges of all the pieces of the pan and tray! I actually enjoyed laying down those beads. =) I didn't get a pic of how I set the up to be welded, but basically I clamped them to the vertical sides of the stainless shelf I use as a welding table top, which allowed me easy access and a very good ground. Grounding is soooo important to welding!
After I got the seems welded together, I tackled welding the vertical braces, which was tricky to ensure that they fit the frame correctly (as the chassis braces are NOT exactly parallel to the frame tubes!) but I did a good job, I think.
Another view of the rear seat pan and the mini-magnets I used for positioning the braces for welding:
Once I got the braces welded in, it was time to weld the front and rear sections together!
I used the clamp on the rear section with a piece of angle under the frame tubes to hold the rear section in place:
I tacked the front and rear together lightly, then held the front in place with some heavy stuff to keep it from pulling while I put more tacks to hold everything in place.
Side note:
This is what happens to a pyrex cup when you drop them while they are hot! This is one of the main reasons why so many guys dislike the pyrex cups, but, I can honestly say I like them especially for tight work!
I didn't grad a pic of the tray welded together, but it fits REALLY well! (Dave can attest to that as he was surprised at how well it fits!)
The last major piece of the seat pan puzzle is the rear trim piece:
This was what I started on yesterday morning. It kicked my butt for a while. I figure I will post my failings as often as I can so people can learn from them, and this is certainly a good time to learn. heh
Here is a shot of me starting to tack the ring I hand made previously that I thought would work really well:
And . . . I was really wrong! As you can see in the next pic:
The collar/ring/piece was curling way too much, to a much smaller radius than what I thought would happen. Here is the top view so you can see it from a different perspective:
Here's the whole thing with the bends slightly exaggerated after I trimmed the tacks off:
I figured that if a ring-type section was curling too much, a straight piece should work just fine! I measured the inside cord length with the cardboard template I had used in mockup with another piece of cardboard I rolled up a bunch of times so I could match the inside radius:
I didn't get a lot of pics for a while since I was busy tacking and bending and generally making a mess of stuff. The straight piece of steel didn't want to bend enough. Instead of fighting, trying to make one piece of steel work, I just went simple and started cutting pieces:
As you can see in the above pic, I welded those pieces on and that was a much better start than what I had before.
A view from the top:
Rear view:
Pieces cut from the original ring-style trim piece:
Clamp and tack and weld and smack and tack and weld:
Some other crappily lit photos of the nearly finished product:
Weld closeup:
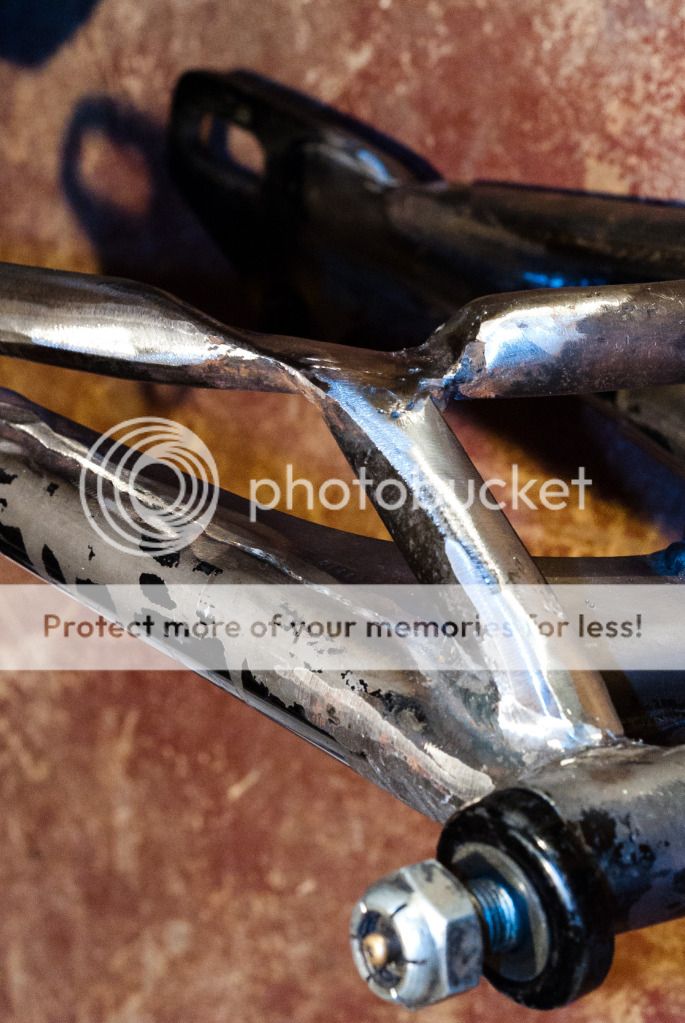
While I was working on the seat pan, I was also heavily involved in Dave's swing arm. He had previously had some bracing welded into the swing arm, and while I generally liked the look of it, I had my concerns about one area:
That thin spot has bothered me since I saw it months ago. I wanted Dave to do something about it. Well, I helped him do something about it! Recycling a piece that I had chopped of Mike's seat hoop, we cut the tube to match the contour of the bracing nicely, then I welded it in thusly:
You can also see some seam welding I did to make it easier for Dave to smooth out the area. It's not straight because I was just following the edge of the factory MIG welded that dave had already ground down. The seam welding will allow him to use less body filler and still have a strong swing arm without a cosmetically nice but structurally compromised unit.
More seam welding:
After the seam welding and additional bracing were completed, I finished up the welding on the seat pan and switched over to a thicker tungsten and got ready for some nasty aluminum welding! (Nasty because I was welding on cast crap, which is nearly always ugly.)
First up:
Dave wanted that nice new aluminum welded onto that brake lever. Note the rubber on the end of the lever . . .
Getting set up:
I also clamped the new piece to hold it in place. If you aren't familiar with welding aluminum, you have NO idea how frustrating an experience it can be. Aluminum acts like warm marshmallows when hot, with a gooey, weird consistency that can be hard to manage, especially as USED cast just sucks up so much gunk, grime and greasy stuff that comes out when heated up, exactly while you are attempting to weld pieces together. You MUST camp things in place, or at least prevent the pieces from moving around much until tacked well on two planes perpendicular to each other. (That is USUALLY enough for most things people are going to be welding.)
Be prepared for ugliness:
Pretty? No. I know it isn't. However . . . it IS solid. Once the welds are smoothed over, you will be hard pressed to tell that the pieces welded together were ever separate.
Dave has some cleanup to do and one hole to drill for the brake lever to function, and he might just want to get some new rubber for the end, also:
Ooooooops!
I don't envy him cleaning that off, either!
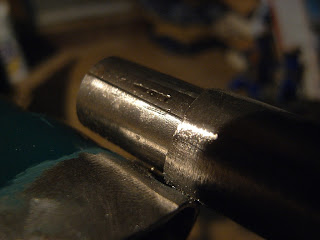
The next bit of aluminum welding is a repair to a brake drum for Mike's CB750:
The broken piece is the mount for the brake cable. Mike bought some 3/4" round stock and I cut a piece to fit, which you'll see in a moment, but I have to make a statement about something first.
NEVER give something this greasy and mucky to a welder!!!!
A welder shouldn't have to clean up a part all that much. Sure, some touchup is always necessary, but . . . this drum cover was really gross. I didn't pay much attention to it at first because just after Mike mailed it to me "shop," he said to ignore it because he was getting another sent to him in the mail. That one turned out to not be correct . . . so I had to fix his drum cover and deal with the nasty burny smokefest it created! BLECH!
Here is the mount after a thorough cleaning and shaping:
Again: CLAMP ALUMINUN IN PLACE!!!!!
I flattened and beveled a side onto the round stock. This turned out really well. I was happy with the fit you see in the previous pic!
After:
Again, ugly, but solid. A bit more cleanup and a new hole drilled, and Mike will be ready to rock some rear (I think) brakes.
Dave also brought a new toy:
It's a 30" sheet metal brake. It's made decently well, especially for the price. I sure could have used it a couple of weeks ago when I started bending up Mike's stuff, but, I'll certainly be using it in the next few days after I clean up the packing grease on it.
Dave also brought a small steel table frame that, with some additional bracing, will be perfect for most of my welding! I'll grab pics of that after I clean up the shop tomorrow.
As to why I haven't been posting much the past two weeks, I'll write a separate blog entry about that later today, maybe.