Tag Line

"Built Dam Strong!"
Showing posts with label roll bar. Show all posts

30 January 2016

Funk-y Fresh Fab: Dash Mount Finishing and Added Roll Cage Bar

Back at catching up on the blog!

One thing that I really don't like about the 1G/3G is the header panel, but I think this pic just looks cool:


When I was welding the dash bases, the cross piece warped, as is pretty usual with aluminum. this is a really easy fix with a vise and some screwdrivers, though:
 You have to compress the metal farther than flat because of springback, so you'll have to play with it to get it back to flat:

 Flat!

In order to fit the dash in, the bottom of the brake master cylinder reservoir holders:

Line up the holes and mark the line to trim:
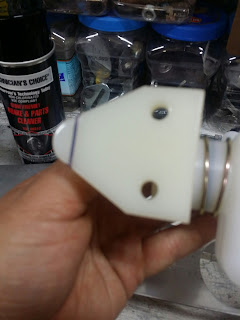
BAM!

 Getting everything else lined up for final welding:


It took a little bit of figuring out how to get everything lined up at the correct depths:

Not too shabby:
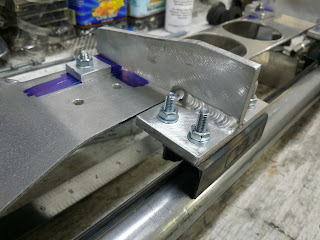


 From there it is a pretty simple matter to weld the mounts to the cage:

And there we have the dash mounted in:
 It just looks so rad!

Next up is adding in a low, horizontal support bar, which is conspicuously missing:

I am really happy with the fitup:


 You'll have to look closely, but I slightly chamfered the edges to provide more room for the weld to bite into the base metal:

Ah, the fun of working on an already caged car! The next two pics I took with me being scrunched up and upside down to weld in the bar:


 Totally uncomfortable.

I wanted to tie in the center of the bar to the chassis, so I worked on bending up a plate around a section of the leftover tube I used for the horizontal support:


Here's what I was aiming for:

Zap zap zap:

The hope for this bar and the tie in is that if there is a hard side impact, the main hoop will be much better supported and prevented from caving in, and since the seat is mounted to part of the cage, this will keep the driver's cell more intact and the driver safer!

That's it for this update!

Please leave me feedback either here or on my Facebook page, which you can find by clicking this link: Beaver Built on FaceBook

You can subscribe to receive new post notifications by entering your email in the box on the right of the article, by RSS feed or by FaceBook. 

Thanks for reading and I hope you find this stuff useful or amusing or both. =) 

27 December 2014

S&W Cage install in an "EG" hatch. This was NOT fun.

Be prepared for a rant. I am in a ranty mood. I think I have every right to a good, old fashioned top-of-the-soapbox rant. First, let's establish some facts.

The company:
S&W Race Cars.

It seems many people have heard of them and their cheap roll bar kits. They sell nearly any 8-point kit of EWS (Electrically Welded Seam) tubing for $199.

The Products I've personally worked with:
92-95 Honda Civic Hatchback
88-91 Honda CRX

First impressions:
The tubing is of good quality. The bends are good mandrel bends. There is very little deformation across the diameter of the tube for the radius of the bend. They do NOT send enough reinforcement plate, in my opinion. The copes and cuts on the tube are done with a plasma cutter, very likely CNC as the similar tubes are nearly exactly the same. The cuts and copes SUCK. Whoever programs the cutter needs to have his job reevaluated.

Second impressions, starting install:
The main hoop of the CRX kit fit well. The main hoop of the "EG" hatch was atrocious. The legs were bent in nearly 4 inches too much.


This picture seems to exaggerate the bends of the legs, but it was really that bad. No, welding the cross bar in did not suck the ends of the legs in much at all.

 I ended up having to do something horrifically janky and dangerous to spread the legs wide enough to hit the reinforcement plates:

That is a 5 ton bottle jack which I maxed out twice and had it fly off twice making me fear for the intactness of my nethers being permanently disturbed. I play with multi-ton steel beams all day and THIS is scarier than nearly anything at work. Springs are a magical, but terrifying thing.

Only one leg moved much, so I ended up just having to roll with things as they were and made due with what was given to me. This is the driver's side:

 Nice and proper, right?

This is the passenger side:

Yuck. remember, this is AFTER stretching the legs about 4" out!

It was hard to get a picture of the whole hoop from the front, but I managed to get the upper parts of the hoop even side to side and front to back (which was no easy feat!). I matched the angle of the door opening to make it look good, just like I did with Steve's cage.

If you'll notice in the pics above, I added in metal around the corner. This is because there wasn't much there to begin with due to some rust damage. That took a whole bunch of time to fix, which was frustrating, but not an issue with the cage itself. Here are some pics from the rust repair and baseplate install:


Lots of welding, but making the foundation for the most important part of the cage solid is really, really important. Having a pretty level base also makes installing the hoop easier, too, so it is vital to get it correct from the get go.

The only halfway decent copes in the entire kit were for the rear bars. These were the easiest to install. The copes could easily be much better with some better programming, but I guess for the price S&W just DGAF about that, preferring to pass on the labor of correcting the copes to you, the consumer.

Rear bar install pics:


I could have sworn I had taken more photos, but, well, I guess I didn't or they didn't save or something. I dunno.

Side rant:

That thing is NOT good for male tender bits. It is in just the wrong place at just the wrong angle to do all sorts of damage to the meat and veg. And rip your pants. That too. But mostly mangle your dangler. Ugh.

Now . . .  here is where I really want to shove poorly coped EWS tubing up the rectum of whomever programmed the cutter.

The center bars Sucked. That is correct. Sucked with a capital "S."

Gaps EVERYWHERE, even after a lot of rework.

It took way too long to get these in:


If you can't confidently fill vertical gaps with MIG, DO NOT purchase this kit. (Well, don't purchase it, anyway.)

This also brings up another annoyance. There are 8 connection points to the chassis. S&W only provides 6 plates. What I ended up doing is splitting the last two plates into slightly more than 1/3 and leaving the rest for the door bars, using the skinny piece for the center braces connection point. You should NEVER weld a tube directly to the body, because there is not enough surface area with enough material thickness (and thus tensile strength) for the connection to actually do anything in case of a crash. You need thicker material and wider material in order to properly distribute the huge forces applied to the tubes in the event of a worst case crash. The instructions are mum on this point, and I find it extremely poor to not include another plate with instructions to split the plate (or, heaven forbid, shear a plate in half and ship it that way) to actually provide proper connection points for all of the tubes.

I eventually got the door bars in, which was a real pain since I ran out of wire, then ran out of gas and had to pay way too much for a bottle from a supplier local to the garage I was working out of.


I managed to keep things fitting tight:
 Both doors close perfectly, but give as much space as possible. The seats fit perfectly well, too. For the record, I do NOT like side/door bars of this sort, but I am of the opinion that if you are putting in a cage, put in a real cage and stop pretending that the car is streetable at this point.

Another shot showing how wonky the main hoop is, as it really doesn't utilize the shape of the car at all well:

After install conclusion:
I will NEVER install another S&W cage knowingly. The fitment is poor. S&W's instructions are poor. S&W's customer support is poor (reference issues with Steve's CRX cage: the center bars are clearly coped for a straight cross bar, not the angled crossbar they supply with the CRX kit, and they just DGAF about correcting that). The price makes the kits appealing, but you have to have well above average fabrication and welding skills in order to install the cage so that it is an actual safety device. This, IMO, makes these kits dangerous, as having a false sense of security is worse that not having a darn cage. One caveat: As you can see, I have only worked on two Honda cages. Their fitment might be better for other makes and models of cars. However, the consistently terrible coping likely carries across all of their products and as such, I cannot recommend you become a guinea pig for them, or you risk your life if you aren't confident that you can fit tubes properly or make them fit as best you can to ensure that you are going to come out alive in the event of a crash.

So, S&W Race Cars cages are NOT Beaver Built Approved. They are cheap monetarily but horrifically espensive in time and consumables. I went through almost six pounds of .030" wire between the rust repair and gap filling. I also used up over two whole 33CF C25 bottles. That adds a somewhat hidden but very significant cost. A well fitting cage would use less than half of that, take less time and probably be safer in the hands of someone who isn't very experienced with welding and fitting tubes.

Just SAY NOT to S&W Race Cars cages. 

01 October 2014

Steve's CRX cage install: Grrrrrrr . . .

I'm not exactly happy with the company (S&W) that bent up this cage. If you remember, last time Steve and I were having some issues figuring out how the heck the middle cross brace tubes are supposed to fit. Steve called them up and from what he related to me of the conversation he had, we're just SOL. There is no way for those tubes to fit as coped with the cross brace being bent as it is. Again, I'm not particularly happy about this or the fact they have no vehicle specific help/pictures/anything. Meh.

Anyway, I did do some work. I didn't take many pics, but here's what I do have:

That's me putting a bevel on the ends of the cross brace tube. Leveling the edge can give you a stronger weld by allowing better penetration. Done incorrectly, and you'll get a weaker joint if the weld isn't made in a manner to allow for enough material to be added to add strength to the joint. On thinner tube like this, it isn't likely that will happen, but it is something to be aware of, so don't go too crazy beveling everything.

Then some TV magic happens and I just so happen to have this one in the oven:

Honestly, the fit wasn't really great. I managed to deal with it, but the bends on the cross bar were about 5* too much. The "inside" of the cross bar had a pretty large gap, which is solidly welded up, but is have preferred a better fit so I could just do one pass and not put so much heat into the joint.

Meh. It's together, pretty level with the top of the main hoop and it is where it needs to be.

That's pretty much it, except I had to deal with this boot thief:

As you can see, he was punished thoroughly! I still don't know why anyone would want to steal my work boots. Ew.

13 September 2014

Installing a pre-bent roll cage into Steve's CRX, Part 1.

My friend Steve has a silly CRX. What makes it silly? Well, just look and see for yourself:

You might say it makes a little power. It is fairly fast, too, so much so that he needs a roll bar if he wants to run the car at a legitimate drag strip. So, he bought a pre-bent cage and since he didn't want to use flux core for this, I brought over my welding setup and got to work, and it will be quite a lot of work.

Here we are getting set up:
As always, cleaning is the most important part of any welding prep:
 Getting into that corner to clean was a pain. I used a combination of a wire cup and a knotted wire brush. Be sure that you move any wires or lines out of the way.

I notched the baseplate to get a better fitup in the corner:

 Because the floor is curved in odd ways I used a hammer to bash the floor flatter and also curve the plate to match the profile better.

The weld marks in the middle of the plate are from where I tacked a piece of flat bar on to get a better ground:
 I managed to get some really good welds:
 And some not so pretty but perfectly good welds:

I will be making some filler plates to fit in the divots under the plate to the floor, as there is a variable gap of 1/8" to about 1/2". This is more than good enough to get started, though. 

This is a weld on the other side:
 That will get the same filler plate treatment.

Here we come to the not so fun part of lining up the main hoop:
 I asked for a tape measure and Steve gave me this:
 I thought he was mocking me, as it is maybe 1.5" big. Great measuring tools . . .

He DID have a couple of decent carpenter's squares. I used them to mark 1' and 2' up from the end of the hoops thusly:
 This gives a relatively fixed position on both legs to measure from, which, theoretically, makes things easier.

I am fairly confused on one thing, though. I don't get how these tubes are supposed to fit in the car or why they are coped the way they are:


 Me working, obviously:

 Bird's eye view, including me READING THE DARN INSTRUCTIONS:
 Where we left off for the day:

With darkness approaching, we cleaned up and I headed out. I am due back to his house on Tuesday, though I might be able to make it Monday after work, too.

And that's the start of it! Look forward to further installments as we get this thing done.