Tag Line

"Built Dam Strong!"
Showing posts with label rocker arm wear. Show all posts

16 August 2012

Chrysler Cleaning, Part 3 (ugh)

More stuff for that darned Chrysler V6. I'm nearly ready to put crap back together. I have to confess, I wasted a lot of time doing something pretty darned unnecessary. Don't you just love when you do something you think is awesome, and, it might just well be, but then you realize there was a way to get the same thing done without any of the extra effort? *shakes head* Learn by living. 

Anyway, on with the show! Here's one of the two boogered up spacer/retainer doohickies:


Here it is after TIGing the edge:

I decided it miiiiight just be time to replace the sanding disc.

Do you think I made the right call? heh My greatest annoyance with changing those things is that most of the paper comes off, but not the really sticky stuff:

The best way I've found to deal with that is actually WD40 and a brass wire brush. Soak the remaining stuff with WD40 and let it sit for a bit, then take the brass brush and working at 90* angles, get the crud off. It still takes a while, BUT there is no damage to the backing wheel, which is important for smooth sanding. After I got the crud off, I washed the wheel off with acetone and stuck a new pad on. I think I might opt for a bit rougher grit next time. The ones I am currently using are 120 grit and they hold up well, but I usually want material taken off faster, so I may drop down to 80 or so. I still have near 50 discs to use . . . it might take years to go through them all. LOL!

After I got the edges sanded up nicely:
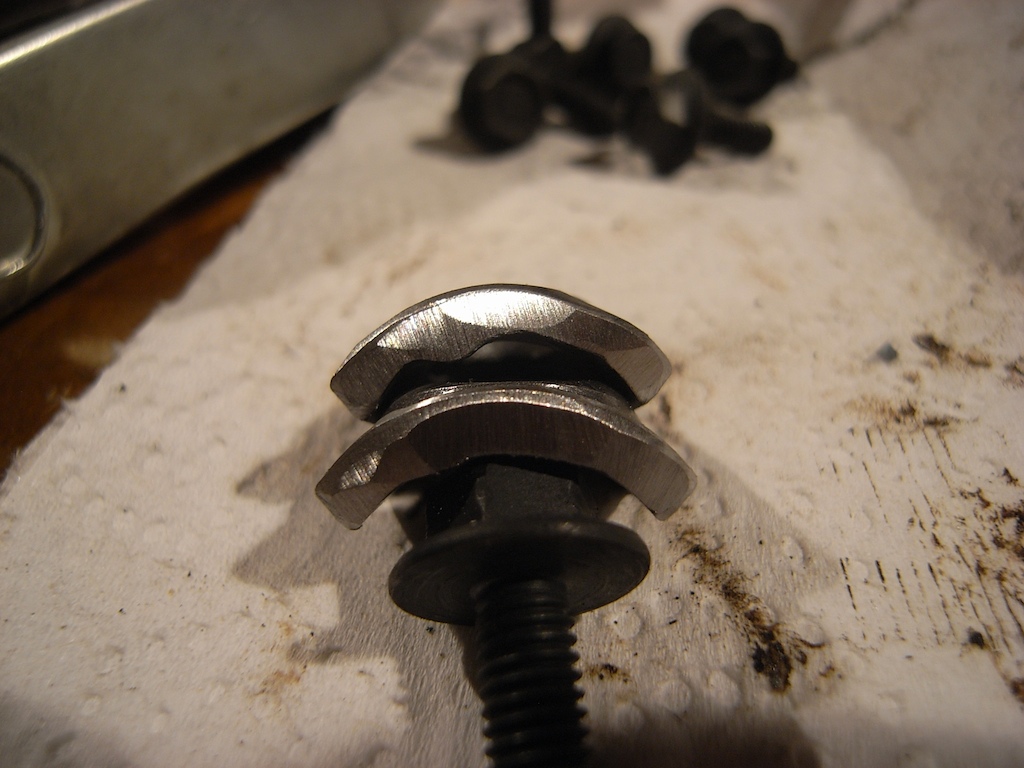
Notice that the top one has a bulge on the concave part, which is not good since that would prevent the piece from sitting on the rocker shaft correctly.  In order to fix that, I busted out one of my all-time favorite tools:

It is a Foredom (that's the brand) hanging, flex-shaft grinder. Why not use a Dremel? Torque. Dremels, quite frankly, suck. Sure, they spin to 35,000RPM, but you can't lean on it at all. I'll take the torque this thing puts out over the speed of a Dremel any day.

But it looks old? Well, it is. I bought it used on ebay. It still works perfectly. I've burned out several Dremels. I doubt I will ever burn this thing out.

Heavy duty and quality made in the US. I also bought this grip:
 I like this one better than the skinnier one that came with the grinder. It has ball bearings so it runs smoother. It has three different collet sizes for different tools, including a 1/8" for Dremel bits. It's also super easy to change out. The metal band clamp that you see on the left side of the handle in the pic above pops off and then the handle comes off with a tug.

If you ever get the chance to upgrade, do it!

I smoothed out the concave section of he retainer thingy:

And then . . . I realize that since there are only two that are really boogered up things, I could have just put them on the ends of the shafts. *facepalm* Oh well. I got some good practice in. I'll keep looking at the positives. heh

Here is the state of the old rocker shaft:

 The hole that is in focus is an oil supply hole. I honestly think that the whole shaft is completely gunked up solid. I didn't want to bother trying to take the press-in end caps off to find out.

That is a LOT of wear . . .

I am surprised the engine ran as long as it did. I just hop I can get it back together well enough to actually run again at least for a while.

Crud, crap, poo, yuck, filth, sludge, grossness, ick, etc.:


This is what I scraped out of the front side of the head:

Click on the pic to get an idea of how thick that stuff is piled onto the paper towel! EEEEW!

This is the new rocker shaft:
I almost oops putting all this together in that the oil supply hole on that shaft was facing up, not down the way it should be.

My last remaining concern is one of the rocker shaft bungs. I tried to run a tap down through it . . . and it wouldn't go. =( All the other ones cleaned up nicely. That one is, of course, on the rear head and the hardest to get to. I am not sure what I a going to do at this point. *sighs* Tomorrow is another day. I have to get some assembly lube and pick up some oil for the engine. I want to coat the new parts in assembly lube so that they don't run dry until the oil pumps up. 

Chrysler Cleaning, Part 2

So, I left off with some nasty parts and some new parts. Today I give you more nasty parts and some cleaned up and "fixed" parts.

Clean, new parts in boxes!

EW!

 Those are the rocker shaft bolts. While cleaning this set, for the front "V" of the engine, I found this rather disconcerting wear:


 Ugh . . . What a mess. Since I don't have the luxury of being able to find those parts for sale easily, I am going to weld them up and file them flat, which is actually going to be better in the long run than the stock material.

This is what the sides of that spacer thing looks like with "normal" wear:

I didn't actually like that. Chrysler didn't even bother to to anything except stamp the piece out in a hydraulic press and install them. That just plain sucks . . . So of course I have to do something about that. Time to bust out the file! I carefully smoothed over the edges that abut against the rockers themselves like so:


 Before anyone complains about removing material . . . The nominal width of the part varied greatly meaning the stamping dies weren't made particularly well in the first place and Chrysler wasn't really concerned about dimensionality. So no, I am not worried about removing material at all, especially with how crappy this setup is.

Once I filed the sides, I put them to the sanding disc on my belt/disc sander to polish them up some more:

Hardly a mirror shine, but much, much better than before. I call that "functional polishing." If the rockers do hit the sides, then there will be much less wear as there is a greater surface area to bear the load. I also de-burred the edges. Tomorrow I will fix the really bad ones and then file and polish them, too. 

14 August 2012

Chrysler cleaning, Part 1.

Some of you may recall these horrific images:

(That is a valve stem poking through a rocker, evidently a common thing for a Chrysler V6.)
(That's just a scoop of the sludge inside the engine . . . EW!)

I started cleaning up the hardware and put together a new set of rockers and shafts:


 Look at this crappy design! The rocker arms just rub on each other . . .
 and stand a good chance of hitting the rocker shaft bolt assembly.
The only thing I can see that keeps them aligned are the pushrods. WTF, Chrysler. W . . . T . . . F . . .

I had also spent some time trying to clean up one of the valve covers . . . I have to get some better cleaning agents. What a gross, sticky disgusting mess. It took me 2 hours to carefully clean up all the hardware for one bank of the engine. I probably could have done it faster, but still . . . taking that long to clean up some bolts and bits? Ew. This is why regular oil changes are important, even if the engine sucks (like this one does)