Tag Line

"Built Dam Strong!"
Showing posts with label cheap tools. Show all posts

14 March 2014

King Sandblaster Reigns! (Not Supreme, but reigns, nonetheless.)

I did some more sandblasting after work today. YAY! I finished the second FUCA (Front Upper Control Arm), then decided to see how well this thing handled crustier stuff. Enter my Hf manifold I've never cared a lick about aside from how it bolts in between the head and the turbo and usually directs exhaust gases into the turbo. 

This is how we started out:

 Typical trusty, crusty cast iron.

After a couple of minutes playing around:


 I then realized I was burning daylight and had better things to do with my time, related to my front suspension. Enter one of the hubs, clean for your consideration:

 The front side is clean, at least. I have to finish the backside.

Notice the tape around the hub stub:
 I don't want to blast the precision machined surface that fits into the bearing. It is already very clean and doesn't need the tolerances changed a bit.

I've been tweaking the setup of the cabinet as I've gone along. Having eliminated all the leaks I can without getting really retarded (and I do need a new hose as the hose is leaking, too, darnit), the only problem I have with blasting continuously is keeping the end of the media feed tube buried.

To that end, and since I nearly always am holding the piece I am blasting closer to the cloudy, sand/dust covered plastic "viewing" shield, I took out the grate:
 This let me use my hands in the gloves to scoop the media over the end of the media feed tube much more easily, and this made blasting a heck of a lot faster.

I am wondering if grounding the cover would help at all. I am pretty sure that most of the issue is static cling.

Finally, this is a for reference shot of the other hub which is about as crusty as the other hub started out:
I totally <3 sandblasting.

11 March 2014

Tool Review: King Brand Magic Eraser (Sandblasting cabinet)

So I've been asked to give more info about the setup I am using. A chance to ramble on about whatever I want? YES, PLEASE! 

I'm using Harbor Freight 70 grit aluminum oxide media that I got on sale a while back:

It seems like it is holding up pretty well, I think partly because I am no where near blasting efficiently due to my lack of correct air volume and pressure.

Here's a shot of the thing sitting conveniently on my stack of Rota C8s:
 The "King" brand sticker seems to be stuck on but from everything I've seen, it is pretty much the same as every other small blast cabinet you'll find on eBay, HF, and even Amazon.

It comes with a transformer to power the 12V (seriously, why????) florescent light in the box.

 I didn't mess with that yesterday, but, honestly, it's not very bright and is pretty darn useless.

Sandblasters like DRY AIR. In preparation to use the cabinet, I bought this HF air line dryer, with some fittings and a "jumper hose:"
 It works VERY well and only leaks a very little bit, which I might be able to fix with some more teflon tape (supplied with the cabinet, actually). Or I can just not bother too much with it.

I had forgotten that in the box of stuff that came in the cabinet that there was a set of nozzles. The pre-installed nozzle was a #5. I swapped in the smallest nozzle in the set, a #4, and that helped A LOT with the air consumption!


It helped enough that I could nearly continuously blast with this little thing:

This became even more useless:
One of these days I'll figure out how to bypass the thermal safety on that and just let it run continuously. If it dies, so be it.

That being said, after tweaking the fittings and air lines, I was able to make a lot more progress in less time this evening!

Don't you just love that finish?

I know I do! 

Here's a closeup of the remaining rubbery residue that was left under the ball joint:


I didn't have enough oomph to take that crap off, so I scraped it off with my pocket knife and was left with shiny, nearly brand new paint underneath:


A few minutes later, SHAZAM!

 All done! I LOVE IT!

Blurry pic is blurry:
 Phones should not be cameras. Yech.

Anyway, that's the inside. It's large enough for nearly anything suspension wise, but I don't think a Honda RTA (rear trailing arm) will fit, even diagonally. We'll find out eventually.

The only really, really annoying thing I've found about the whole thing is this:
 Can you see through that? No? Well, I can't, either. It's mostly from static cling. The sandblasting creates enough static electricity to zap me occasionally, and it also sticks the particles to the clear sheet (I have no idea if it is acrylic or whatever) that you are supposed to see through. I'll be trying to figure out how to prevent that.

And yes, it leaks:

So what? That can be fixed, if you want to bother spending the time. I don't at the moment and I never may. 

Summary of the pros and cons:

Pros:
-Price
-It comes mostly assembled (except for the filter and air supply hoses) out of the box
-Surprisingly effective with less than ideal air supply
-Well sized (Smaller would be annoying, larger would be too big for nearly any small work area)
-)(#*)(*$# CLEAN SUSPENSION PARTS! 

Cons:
-Static cling blocks your view
-It leaks

Would I recommend it? YES. 
Would I spend the time to fix the leaks before using it? MAYBE. If you are going to use it all the time, then yes, it would be a good idea. I am mostly going to use this a lot for a little while and then leave it alone in between various projects, so I am not sure if the time would be worth it when I could put that time into getting my CRX's suspension cleaned, painted and installed. 


18 May 2012

Wear your effing safety glasses/goggles/shields.

After a late but very productive day yesterday, today started off bright and early with a good breakfast and running a few errands. After getting that stuff done, I header over to the "shop" and set to work.

I had noticed yesterday that the bandsaw wasn't exactly set very perpendicular to the work table, so I got out my square and got it as close as I could. Then I cut four 1.5" long pieces of tube:


They turned out really decently with the adjustment! Also, as a side note: ALWAYS DE-BUR YOUR WORK! Always. It saves your fingers and makes fitup a lot better overall. 

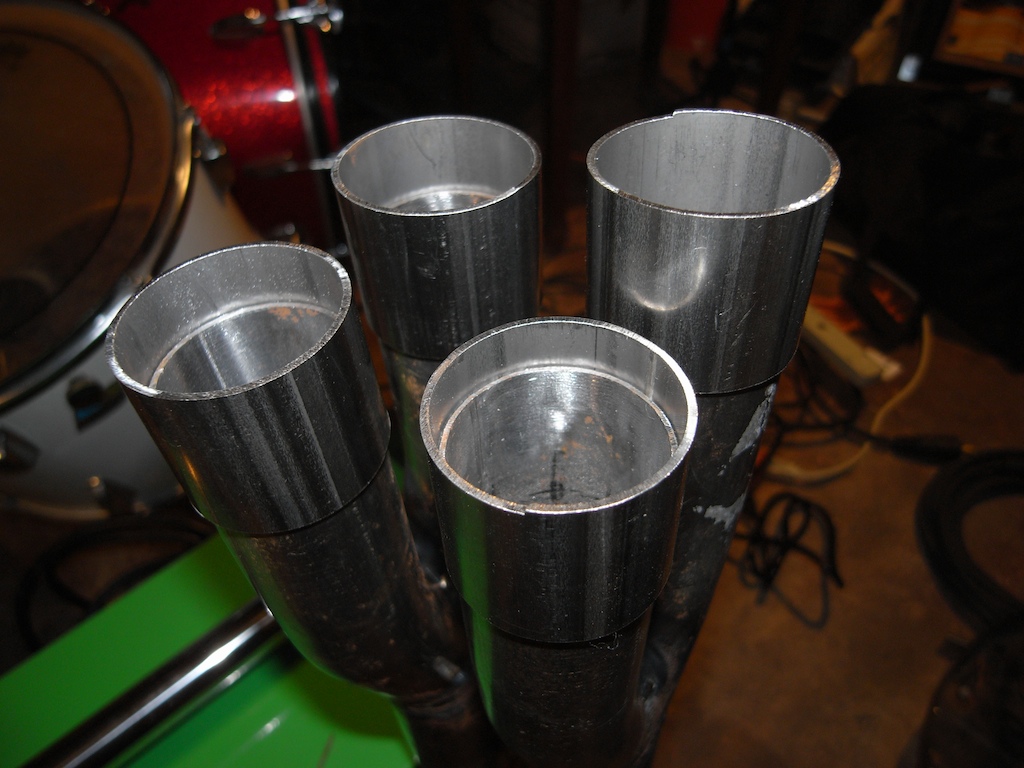
Those four pieces are going to be slip fit collars for a collector:


The reason for doing it this way is that the steel is good quality and thick enough (16g) so that "normal" tailpipe expanders cannot actually expand the metal enough to make slip fit joints. This is HIGHLY annoying to me. My good tailpipe expander is even too large to fit into the tubing of that particular collector, so I am forced to try goofy things like this. The hardest part will be welding the insides, though I am likely going to cheat and MIG those parts since even my small TIG torch can't really reach in too far and the pieces will need to seal. 

Once I finished those up, I moved on to the next task: removing the motor from my Che-ese drill. (Che-ese = Cheap + Chinese)


I've had this thing since 2003. It stopped working last summer. I figured that the cheap motor just died. No biggie. I'd take the motor to an electrical supply store and get a new one that is likely way more torquey than the old one. Well, that wasn't the case. I pulled the switch plate off and was looking at the wiring, figuring that maybe something had come loose, since, after all, this is a Che-ese drill, and something could have fallen apart. Poking around the innards, I found wiring that didn't make much sense. How hard can it be to wire in two three-wire wires? (Hot, neutral and ground, the modern wiring standard for AC electrical supply.) Well . . . after a few minutes of probing the switch and wires with my multimeter, I was convinced that the darn thing hadn't been wired correctly from the beginning. I switched two wires around and the motor spun up better than ever! Now the only question that remains is how the heck did it work for 7 years with the wiring screwed up? That is some Chinese magic, no doubt. 

I spent a good bit of time sharpening tungsten after that. Talk about mind-numbing activities . . . I mean, it is involving. You have to angle the tungsten correctly, rotate it at the right speed and hold on to it without letting it bounce too much on the stone. What's worse is that I was starting from scratch with 10 brand new 1/16" electrodes. You might think that thinner would be faster, but that isn't the case, because you can overheat them much more easily so you can't apply as much pressure as you would a thicker tungsten.

I haven't used any electrodes so thin before. I am kinda of excited to see what difference it will make when welding the thin tubing and sheet I am going to be concentrating on over the next week!

The afternoon progressed into early evening. I started up on another piece to a puzzle: the rear hoop for Mike's CB450 frame. He bought a pre-bent hoop that was mostly the right width but with legs that were too long. That isn't an issue with a bandsaw around, though. =) 

As I mentioned a moment ago, the hoop was mostly  the right width and I wanted to spread the legs a bit wider to neaten up the transition as much as possible so I can save myself some work and make things look cleaner all together. 

Here's the hoop in the vise:


I simply used the vise to act as an expander.


With the extra length of the legs, I got the hoop to open up a bit, but the material sprung back quite a bit. I shortened the legs up just past the first bends and started to slowly expand the hoop which worked brilliantly. 


I was taking it very slow, working the hoop a little at a time, since too much too fast is NOT a good thing when trying to maintain a nice, mandrel bend. 

Until . . . the hoop sprung off the vise so fast i couldn't even react and it hit me in the face. Specifically, it hit my right eye lens of my safety glasses and smacked my lip pretty good, too. The impact was so intense, the edge of my safety glass lens sliced open my cheek like a shear, thusly:


My face hurts. I cleaned up the cut and put the butterfly on it. I know I am going to get fussed over when "normal" people see it (especially a certain woman), but it'll be fine eventually. After I got it cleaned up I tried on a different set of safety glasses and my nose promptly protested enough to tell me to call it quits for the evening. 

The whole point of this is that I would be out an eye, or, look like I lost a fist fight if I had not been wearing my safety glasses. WEAR THEM. You are beyond foolish is you don't. Wear them before you start working. Keep them on at all times. Don't take them off until all your tools are at least at rest and nothing is under tension or stress. 

Final pic of the evening:


The angle of the camera lens throws the perspective off a bit, but the hoop nearly matches the outside of the frame rails. This will be much easier to fit up once I trim the legs to match the profile that Mike wants, which is basically as short as possible to enhance the lines of the bike.